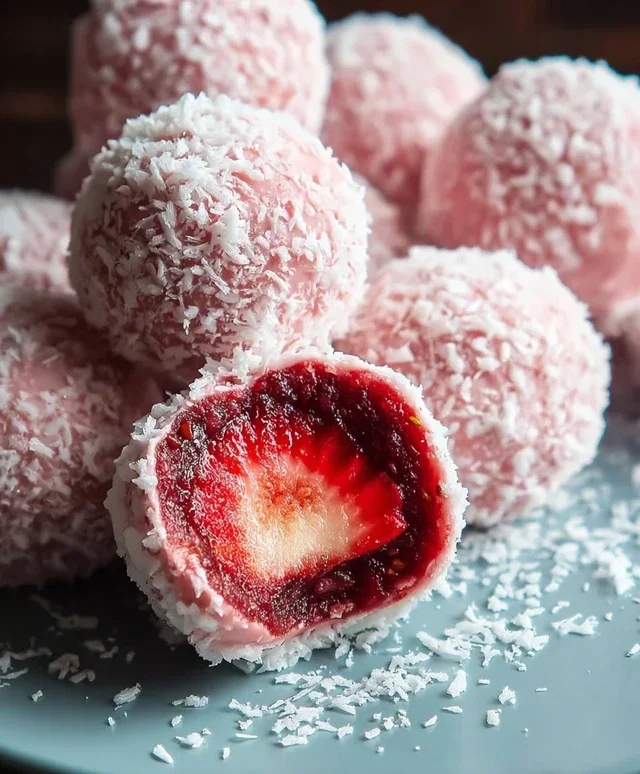
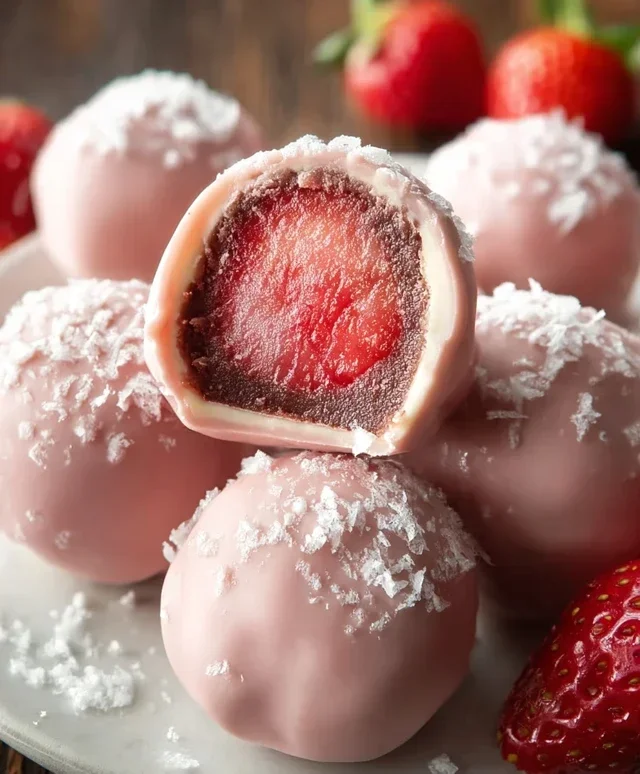
Easy Strawberry Truffles- Delicious No-Bake Dessert
Strawberry truffles are more than just a delightful confection; they are a little bite of pure bliss that melts in your mouth. Imagin extracte the intense sweetness of ripe strawberries, perfectly balanced with rich, decadent chocolate, all encapsulated in a smooth, velvety sphere. It’s no wonder these exquisite strawberry truffles are a perennial favorite for special occasions and sweet cravings alike. What truly sets these treats apart is their elegant simplicity. They manage to be both incredibly sophisticated and wonderfully comforting, making them the perfect indulgence to share with loved ones or to savor all to yourself.
Prepare to fall in love with the art of making these irresistible strawberry truffles.
Strawberry Truffles
There’s something undeniably elegant and delightfully decadent about homemade truffles. They’re the perfect little bites for a special occasion, a thoughtful homemade gift, or simply when you want to treat yourself to something truly special. Today, we’re diving into the delightful world of Strawberry Truffles. Imagin extracte a burst of sweet strawberry flavor enrobed in smooth, creamy white chocolate – pure bliss! These little gems are surprisingly easy to make, requiring just a handful of simple ingredients. Get ready to impress yourself and anyone lucky enough to snag one of these precious confections.
Ingredients:
Crafting Your Strawberry Truffles
Let’s get started on creating these delightful treats. The process is straightforward, but paying attention to a few key details will ensure your truffles are perfectly smooth and flavorful.
Phase 1: Creating the Ganache Base
The foundation of any good truffle is a smooth, luscious ganache. For our strawberry truffles, we’ll be working with white chocolate, which requires a slightly different approach than dark or milk chocolate to prevent scorching.
1. Begin extract by gently heating the heavy whipping cream and unsalted butter in a small saucepan over low heat. You want to bring this mixture just to a simmer – look for small bubbles around the edges of the pan. Do not let it come to a rolling boil, as this can cause the butter to separate or the cream to scald. Stir occasionally to ensure the butter is fully melted and incorporated into the cream. Once it’s steaming and the butter has melted, remove the saucepan from the heat.
2. In a heatproof bowl, place your 1 cup of white chocolate chips. It’s important to use good quality white chocolate chips for the best flavor and melt. Pour the hot cream and butter mixture directly over the white chocolate chips. Let this sit undisturbed for about 5 minutes. This resting period is crucial as it allows the residual heat from the cream mixture to gently melt the white chocolate without direct heat, which can cause it to seize or become grainy.
3. After the 5 minutes have passed, gently whisk the mixture, starting from the center and working your way outwards. Continue whisking until the white chocolate is completely melted and you have a smooth, glossy, and emulsified ganache. If you notice any unmelted bits of chocolate, you can return the bowl to a very gentle double boiler (a bowl set over a pan of simmering water, ensuring the bottom of the bowl doesn’t touch the water) for a minute or two, stirring constantly until smooth. Be very careful not to overheat.
Phase 2: Infusing the Strawberry Flavor and Color
Now it’s time to add those signature strawberry notes and a beautiful blush pink hue.
4. To the smooth white chocolate ganache, add the ½ teaspoon of strawberry extract and the ¼ teaspoon of vanilla extract. Stir these in thoroughly. The extracts will enhance the sweet, fruity flavor of the strawberries. Next, add just 1 drop of pink food coloring. Remember, a little goes a long way with food coloring, especially gel or liquid varieties. Stir until the color is evenly distributed and you achieve a delicate, rosy pink shade. You can always add another tiny drop if you desire a deeper color, but it’s best to start conservatively.
Phase 3: Chilling and Shaping
For the truffles to hold their shape, the ganache needs to firm up.
5. Cover the bowl with plastic wrap, pressing the wrap directly onto the surface of the ganache to prevent a skin from forming. Refrigerate the ganache for at least 2-3 hours, or until it is firm enough to scoop and roll. You’re looking for a consistency similar to peanut butter – firm but pliable. Once chilled, use a small cookie scoop or a tablespoon to portion out the ganache. Working quickly with slightly damp hands (this helps prevent sticking), roll each portion into a smooth ball. If the ganache becomes too soft while you’re working, simply pop it back into the refrigerator for 15-20 minutes to firm up again.
Phase 4: The Final Touch – Dusting
The final step is to give our beautiful strawberry truffles that classic, slightly sweet coating.
6. In a shallow bowl or plate, place your ¼ cup of powdered sugar. Gently roll each chilled, shaped truffle in the powdered sugar until it’s evenly coated. You want a light dusting, not a thick layer. Place the finished truffles on a parchment-lined baking sheet or in small candy liners. For the best texture, I recommend letting the coated truffles sit at room temperature for about 30 minutes to an hour before serving. This allows the powdered sugar to adhere and the truffle interior to soften slightly to its ideal consistency.
And there you have it – your very own batch of homemade Strawberry Truffles! They are a testament to how simple ingredients can create something truly extraordinary. Enjoy these little bursts of joy!
Conclusion:
There you have it – a delightful recipe for homemade Strawberry Truffles that are sure to impress! These little bursts of fruity, chocolatey goodness are surprisingly simple to make, making them a perfect project for begin extractners and seasoned bakers alike. The combination of fresh strawberries and rich chocolate creates a flavor profile that is both elegant and comforting. They’re wonderfully versatile and can be dressed up or down depending on the occasion.
I highly recommend serving these Strawberry Truffles as an exquisite dessert after a special meal, as a delightful addition to a dessert platter, or even as a thoughtful homemade gift. For variations, consider adding a touch of liqueur extract like Cbeef hambord for an adult twist, or a pinch of chili powder for a subtle kick. You could also try different types of chocolate, like white chocolate or dark chocolate, to customize the flavor. Don’t be afraid to experiment and make them your own! Give this recipe a try – I promise you won’t be disappointed.
Frequently Asked Questions:
How should I store my Strawberry Truffles?
For best results, store your Strawberry Truffles in an airtight container in the refrigerator. They will keep well for about a week. Allow them to come to room temperature for about 15-20 minutes before serving for the perfect texture.
Can I use frozen strawberries instead of fresh?
While fresh strawberries are ideal for their vibrant flavor and texture, you can use frozen strawberries. Ensure they are completely thawed and thoroughly drained of excess moisture before incorporating them into the recipe. You might need to cook them down slightly more to reduce the water content.
Strawberry Truffles
Decadent and easy-to-make strawberry truffles with a creamy white chocolate base.
Ingredients
-
1 cup white chocolate chips
-
1/4 cup unsalted butter
-
3 tablespoons heavy whipping cream
-
1/2 teaspoon strawberry extract
-
1/4 teaspoon vanilla extract
-
1 drop pink food coloring
-
1/4 cup powdered sugar
Instructions
-
Step 1
Melt white chocolate chips and butter in a microwave-safe bowl in 30-second intervals, stirring in between, until smooth. -
Step 2
Gently heat heavy whipping cream in a small saucepan or microwave until warm, but not boiling. -
Step 3
Pour the warm cream into the melted chocolate mixture and stir until fully combined and smooth. -
Step 4
Stir in the strawberry extract, vanilla extract, and pink food coloring until the desired color is achieved. -
Step 5
Cover the bowl and refrigerate for at least 1 hour, or until firm enough to roll. -
Step 6
Scoop small portions of the mixture and roll them into balls. Then, roll each ball in powdered sugar. -
Step 7
Place the finished truffles on a parchment-lined baking sheet and refrigerate for another 15-30 minutes to set.
Important Information
Nutrition Facts (Per Serving)
It is important to consider this information as approximate and not to use it as definitive health advice.
Allergy Information
Please check ingredients for potential allergens and consult a health professional if in doubt.