Easy Homemade Fruit Leather Recipe- Delicious & Healthy Treat

Homemade fruit leather is one of those magical treats that instantly transports me back to childhood. Think about it – that chewy, intensely fruity, and delightfully sweet snack that was always a welcome addition to lunchboxes or after-school adventures. What makes this simple confection so enduringly popular? It’s the pure, unadulterated flavor of real fruit, concentrated into a portable and satisfying bite. Unlike store-bought versions that can sometimes be loaded with artificial ingredients, a homemade fruit leather recipe allows you to control exactly what goes in, ensuring a wholesome and delicious outcome. It’s incredibly special because you’re essentially capturing the essence of your favorite fruits in a vibrant, pliable sheet, making it a fun and rewarding project for bakers of all ages. Get ready to rediscover this classic delight with our easy-to-follow guide.
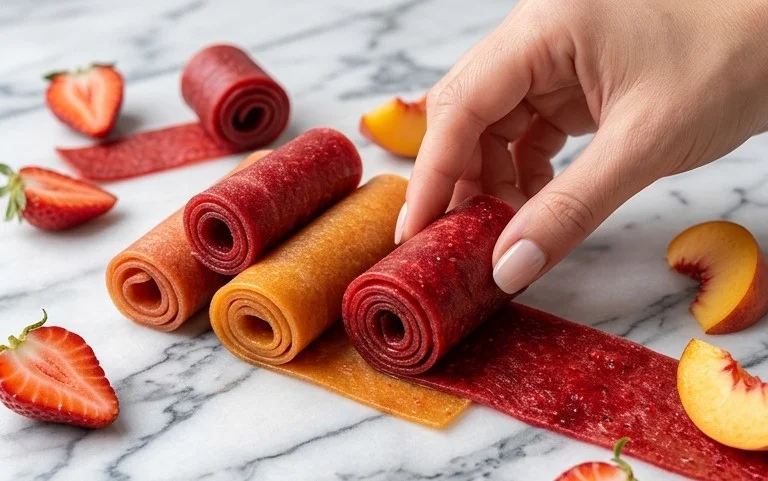
Homemade Fruit Leather Recipe

Homemade Fruit Leather Recipe

There’s something incredibly satisfying about making your own fruit leather. It’s a fantastic way to preserve the vibrant flavors of fresh fruit, and the result is a chewy, intensely fruity treat that’s leagues beyond anything you can buy in a store. Plus, it’s a healthier alternative to many commercially produced snacks, as you control the sugar content and can avoid artificial ingredients. This recipe is wonderfully simple and adaptable, making it perfect for begin extractners and experienced cooks alike. I love experimenting with different fruits each season, but this basic method always yields a delicious result.

Ingredients:

  • 2 cups fruit, chopped (any kind you like – berries, peaches, apples, mangoes are all fantastic)
  • 3 tbsp white sugar (adjust to your preference based on the sweetness of your fruit)
  • ½ whole lemon, just the juice
  • Instructions:

  • Prepare Your Fruit: The first step is to get your fruit ready. Wash it thoroughly, and if you’re using fruits like apples or peaches, you’ll want to peel them and remove the cores or pits. For berries, simply give them a good rinse. Chop your fruit into relatively small, uniform pieces. This helps everything cook down evenly and blend smoothly later on. If you’re using frozen fruit, thaw it completely before chopping. I often find that a mix of fruits adds an extra layer of complexity to the flavor, so don’t be afraid to combine a few different kinds! For example, a blend of strawberries and apples makes a wonderfully sweet and slightly tart leather.
  • Cook the Fruit: In a medium saucepan, combine your chopped fruit with the white sugar and the juice of half a lemon. The lemon juice is key here; it not only brightens the flavor of the fruit but also acts as a natural preservative, helping your fruit leather last longer. Turn the heat to medium and bring the mixture to a gentle simmer. Stir frequently to prevent the fruit from sticking to the bottom of the pan. As the fruit heats up, it will start to break down and release its natural juices. Continue to simmer for about 10-15 minutes, stirring occasionally, until the fruit is very soft and has started to break apart. The goal is to cook it until it’s mushy enough to blend easily.
  • Blend to Perfection: Once the fruit is nicely softened, carefully transfer the mixture to a blender or food processor. Be cautious, as the mixture will be hot. Blend until you have a completely smooth purée. If you prefer a slightly chunkier texture, you can pulse it a few times instead of blending until totally smooth. For an extra-smooth fruit leather, you can even pass the purée through a fine-mesh sieve to remove any stray seeds or tough bits, although this is entirely optional. You’re aiming for a consistency similar to applesauce. Taste the purée at this stage and adjust the sugar if needed. Remember, the sweetness will become more concentrated as the leather dries, so err on the side of slightly less sweet at this point if you’re unsure.
  • Dehydrate Your Leather: Preheat your oven to its lowest setting, typically around 170-200°F (77-93°C). Line a baking sheet with parchment paper or a silicone baking mat. This is crucial to prevent the fruit leather from sticking. Pour the fruit purée onto the prepared baking sheet. Spread it out evenly into a thin, uniform layer, about 1/8 to 1/4 inch thick. The thinner you spread it, the faster it will dry. Try to get the edges as even as the center. If you want to make multiple flavors or smaller portions, you can use multiple baking sheets or create dividers with the parchment paper. Make sure there are no thick spots, as these will dry at a different rate than the thinner areas, leading to uneven texture.
  • Bake and Dry: Place the baking sheet in the preheated oven. You’ll need to bake the fruit leather for a long time, typically 4-8 hours, or even longer, depending on the thickness of your layer and the humidity in your kitchen. The key is to bake it at a very low temperature to dry it out rather than cook it further. You want it to be leathery and no longer sticky to the touch. About halfway through the drying time, or every couple of hours, you can gently peel back a corner to check for dryness. The edges will usually dry faster than the center. If you notice any parts drying too quickly or browning, you can carefully remove that section or cover it loosely with a piece of foil. You can also prop the oven door open a crack with a wooden spoon to allow moisture to escape, which can speed up the drying process. The fruit leather is ready when it’s firm enough to peel off the parchment paper without tearing and has a chewy texture. It should feel slightly tacky but not wet.
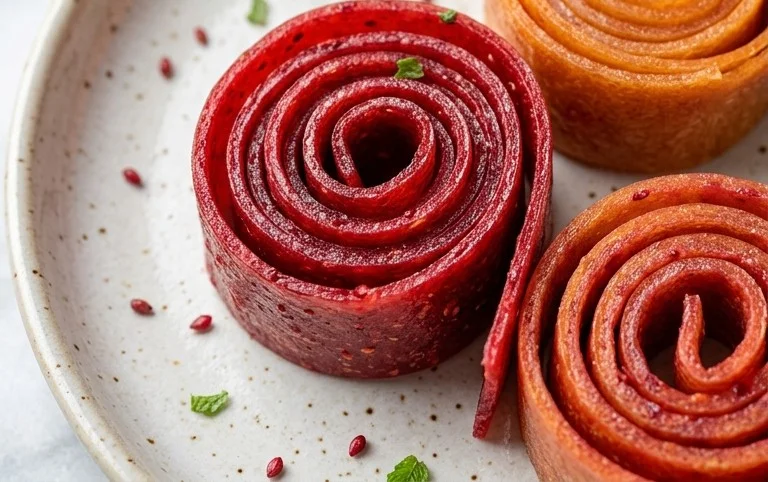
  • Cool and Cut: Once your fruit leather is perfectly dry and leathery, carefully remove the baking sheet from the oven. Let the fruit leather cool completely on the baking sheet. This is important because it will continue to firm up as it cools. Once cool, you can peel the entire sheet off the parchment paper. Then, use a sharp knife or pizza cutter to slice it into strips, squares, or whatever shapes you desire. You can roll them up like traditional fruit roll-ups or cut them into bite-sized pieces. Store your homemade fruit leather in an airtight container at room temperature for up to two weeks, or in the refrigerator for longer storage. You can also wrap individual pieces in parchment paper or wax paper for easy grabbing and snacking. Enjoy your delicious, homemade creation!
  • Homemade Fruit Leather Recipe

    Conclusion:

    Creating your ownhomemade fruit leather recipeis an incredibly rewarding and surprisingly simple process. It’s a fantastic way to preserve the natural sweetness of fresh fruit, avoid artificial additives and excessive sugar often found in store-bought versions, and provide a healthy, delicious snack for yourself and your family. The versatility of this recipe means you can tailor it to your favorite fruits and flavor profiles, making it a truly personal creation. Whether you’re looking for a guilt-free treat for lunchboxes, a vibrant addition to a cheese board, or a fun activity to do with kids, this fruit leather recipe delivers every time.

    Don’t be afraid to experiment! Try combining different fruits for unique flavor blends, or adding a pinch of cinnamon or a hint of vanilla extract for an extra layer of taste. The possibilities are endless, and the satisfaction of enjoying something you made from scratch is unparalleled. So, gather your favorite fruits, preheat your oven, and give this delightfulhomemade fruit leather recipea try. You’ll be amazed at how easy and rewarding it is!

    Frequently Asked Questions:

    What are the best fruits to use for homemade fruit leather?

    Almost any fruit can be used! Berries like strawberries, raspberries, and blueberries are excellent choices, as are stone fruits such as peaches, plums, and apricots. Apples and pears also work wonderfully. For a tangier flavor, consider adding mango or kiwi. Combining different fruits can create unique and delicious flavor profiles.

    How should I store homemade fruit leather?

    Once completely cooled and cut, store your fruit leather tightly wrapped in plastic wrap or in an airtight container. It will keep well at room temperature for a week or two, or you can refrigerate it for longer storage (up to a month). For even longer preservation, you can freeze it.

    Can I make fruit leather without an oven?

    Yes, you can! A dehydrator is an excellent alternative to an oven for making fruit leather. Follow the same preparation steps, but dehydrate at the recommended temperature until the leather is pliable and no longer sticky. This method often yields a chewier texture.


    Homemade Fruit Leather

    Homemade Fruit Leather

    A simple and delicious way to preserve fresh fruit, creating a chewy and sweet treat perfect for snacks.

    Prep Time
    15 Minutes

    Cook Time
    15 Minutes

    Total Time
    55 Minutes

    Servings
    Approximately 1 pound

    Ingredients

    • 2 cups fruit, chopped
    • 3 tbsp white sugar
    • 1/2 whole lemon, just the juice
    • 1/4 cup water
    • 1/4 teaspoon vanilla extract
    • Pinch of salt

    Instructions

    1. Step 1
      Combine the chopped fruit and sugar in a saucepan.
    2. Step 2
      Add the lemon juice, water, vanilla extract, and salt to the saucepan.
    3. Step 3
      Cook over medium heat, stirring occasionally, until the fruit has softened and broken down, about 10-15 minutes.
    4. Step 4
      Puree the mixture using an immersion blender or transfer to a regular blender until smooth.
    5. Step 5
      Pour the puree onto a baking sheet lined with parchment paper, spreading it thinly and evenly.
    6. Step 6
      Bake in a preheated oven at 170°F (77°C) for 4-6 hours, or until the fruit leather is no longer sticky to the touch.
    7. Step 7
      Let cool completely, then cut into strips.

    Important Information

    Nutrition Facts (Per Serving)

    It is important to consider this information as approximate and not to use it as definitive health advice.

    Allergy Information

    Please check ingredients for potential allergens and consult a health professional if in doubt.

    Similar Posts

    Leave a Reply

    Your email address will not be published. Required fields are marked *