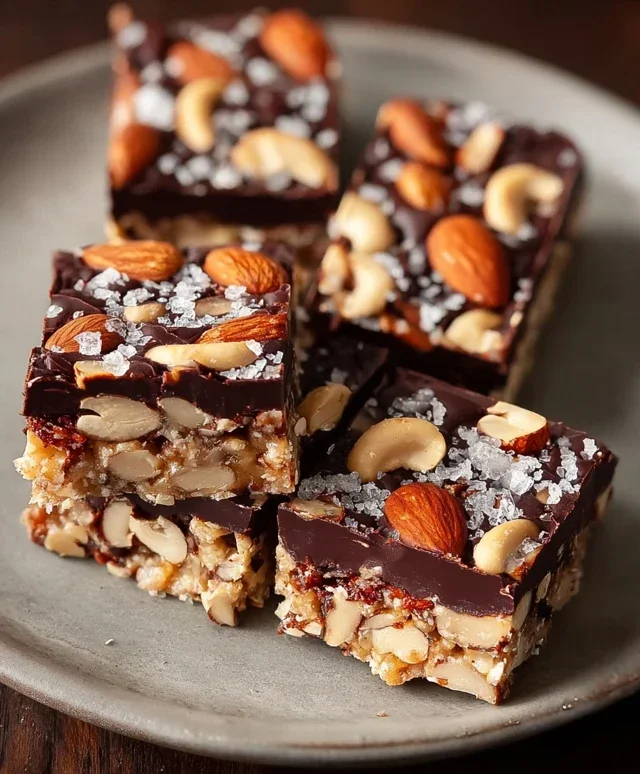
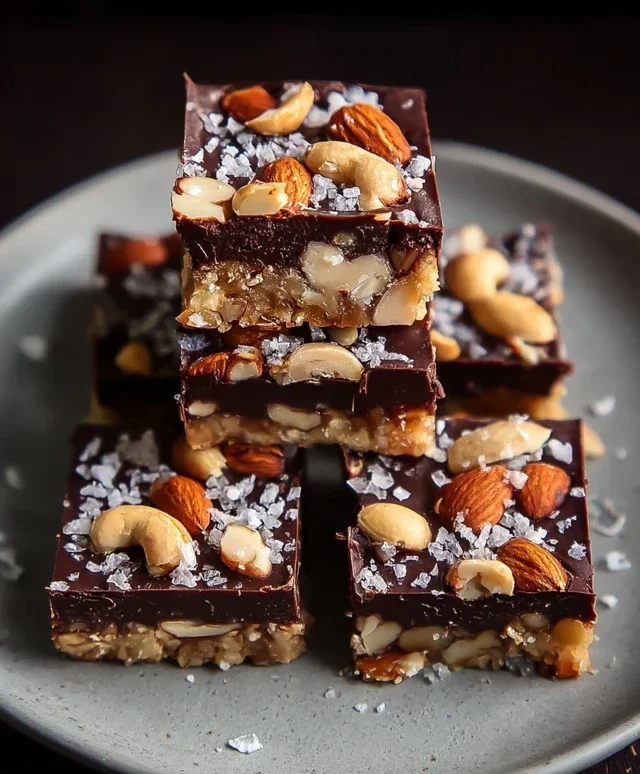
Dark Chocolate Sea Salt Nut Bars-Easy Recipe
Dark Chocolate and Sea Salt Nut Bars are a revelation in simple, satisfying snacking. Forget those overly processed, bland energy bars; we’re talking about a treat that hits all the right notes – a delightful dance between rich, decadent dark chocolate and the bright, invigorating pop of sea salt. I’ve always been drawn to recipes that deliver maximum flavor with minimal fuss, and these Dark Chocolate and Sea Salt Nut Bars are the epitome of that philosophy. They’re wonderfully versatile, perfect for a mid-afternoon pick-me-up, a post-workout reward, or even a sophisticated addition to your dessert spread. What truly sets these bars apart is the perfect harmony of textures and tastes – the satisfying crunch of toasted nuts, the smooth melt of premium dark chocolate, and that essential sprinkle of flaky sea salt that elevates every single bite. Get ready to discover your new favorite go-to snack!
Ingredients:
These Dark Chocolate and Sea Salt Nut Bars are my absolute go-to for a quick, satisfying snack. They strike that perfect balance between sweet, salty, and wonderfully crunchy. The richness of the dark chocolate paired with the subtle crunch of puffed rice and a medley of nuts is just divine. Plus, they’re incredibly easy to make, which is always a win in my book. Forget those store-bought bars loaded with who-knows-what; these homemade beauties are packed with wholesome goodness and you know exactly what’s going into them. They’re perfect for a mid-afternoon pick-me-up, a pre- or post-workout fuel, or even a simple treat to enjoy with a cup of tea or coffee.
Preparing Your Nuts and Dry Ingredients
The first step to creating these delicious bars is to get all your dry ingredients ready. I like to use a mix of nuts for a more complex flavor and texture, but feel free to customize this based on your favorites. My usual combination is cashews for their creamy texture, peanuts for that classic nutty flavor, and almonds for a bit of a crunch. If you prefer, you could go all almonds, or perhaps add some walnuts or pecans for a richer, more earthy taste. Toasting your nuts beforehand can really elevate the flavor, bringin extractg out their natural oils and adding a deeper, more complex aroma. You can do this by spreading them on a baking sheet and toasting them in a preheated oven at 350°F (175°C) for about 8-10 minutes, or until fragrant. Just be sure to watch them closely as nuts can burn quickly! Once they’ve cooled slightly, roughly chop them. You don’t want them to be powdered, but rather in bite-sized pieces for good texture in the bars.
In a large mixing bowl, combine your chopped nuts with the puffed rice. Puffed rice adds a wonderful lightness and crunch that contrasts beautifully with the denser nuts. It’s like a little bit of crispy joy in every bite. I find that using a good quality puffed rice cereal works best; avoid anything too sugary or overly flavored. Make sure everything is well distributed so you get an even mix of nuts and rice in every bar.
Creating the Binding Syrup
Now, let’s get to the sticky, sweet part that holds everything together. In a small saucepan over medium heat, combine the brown rice syrup, vanilla extract, and sea salt. Brown rice syrup is fantastic because it provides a lovely chewy texture and a milder sweetness compared to honey or maple syrup, which can sometimes overpower the nut flavors. The vanilla extract adds a subtle warmth and complexity, while the sea salt is crucial for enhancing all the other flavors and providing that irresistible salty counterpoint to the sweetness. Stir this mixture gently as it heats up. You want it to become warm and fluid, but not boiling vigorously. Just let it simmer for a minute or two to allow the flavors to meld.
Combining and Pressing the Mixture
Once the syrup mixture is warm, pour it over the nut and puffed rice mixture in your large bowl. Now comes the arm workout! You need to stir everything together thoroughly until all the dry ingredients are well coated with the syrup. This might take a little effort, as the syrup can be a bit sticky. I find using a sturdy spatula or a wooden spoon works best here. Get in there and really mix it well, ensuring no pockets of dry ingredients are left behind. The goal is a cohesive mixture that will hold its shape when pressed.
Now, prepare an 8×8 inch baking dish by lining it with parchment paper. Leave some overhang on the sides; this will make it super easy to lift the entire block of bars out once they’re set. This is a crucial step to prevent sticking and ensure easy removal. Pour your combined nut and syrup mixture into the prepared baking dish. This is where you’ll need to apply some firm pressure to really pack it down. I like to use the back of a spatula or even the bottom of a glass to press the mixture evenly and tightly into the pan. The tighter you pack it, the more likely your bars are to hold together well. Take your time with this step; a well-pressed mixture is key to bars that don’t crum extractble.
Adding the Dark Chocolate Drizzle and Setting
Once the nut mixture is firmly pressed into the pan, it’s time for the pièce de résistance: the dark chocolate. In a small, microwave-safe bowl, combine the dark chocolate chips and the coconut oil. Coconut oil helps the chocolate melt smoothly and creates a beautiful, glossy drizzle. Microwave the chocolate and coconut oil in 30-second intervals, stirring well after each interval, until it’s completely melted and smooth. Be careful not to overheat the chocolate, as it can seize up. You want a lusciously smooth, pourable consistency.
Once the chocolate is melted, drizzle it evenly over the pressed nut mixture in the baking dish. You can use a spoon to create swirls or simply pour it in a zig-zag pattern. For an extra touch of elegance and flavor, sprinkle some flaky sea salt over the melted chocolate while it’s still wet. This amplifies the sweet and salty contrast beautifully. Gently press the chocolate down slightly with your spatula to help it adhere to the nut mixture.
Now, you need to let these bars set. Place the baking dish in the refrigerator for at least 2-3 hours, or until the chocolate is completely firm and the nut mixture is set. For the best results and the cleanest cuts, I usually leave them in there overnight. Once they’re fully chilled and firm, use the parchment paper overhang to lift the entire block out of the pan onto a cutting board. Then, using a sharp knife, cut the block into your desired bar shapes. These bars store wonderfully in an airtight container in the refrigerator for up to a week. Enjoy your delicious homemade Dark Chocolate and Sea Salt Nut Bars!
Conclusion:
And there you have it – a simple yet incredibly satisfying recipe for Dark Chocolate and Sea Salt Nut Bars that’s sure to become a staple in your kitchen! These bars are a perfect balance of sweet, salty, and nutty, offering a sophisticated and healthy snack option. They’re fantastic because they require no baking, making them a quick and accessible treat for busy weeknights or last-minute cravings. The rich dark chocolate paired with the satisfying crunch of nuts and the delightful pop of sea salt creates a truly memorable flavor profile.
Enjoy these versatile bars as a midday pick-me-up, a post-workout refuel, or even a delicious dessert. For serving, I love breaking them into generous portions and enjoying with a cup of herbal tea or a glass of almond milk. They also make a wonderful homemade gift for friends and family.
Don’t hesitate to get creative with variations! Feel free to swap out the nuts for your favorites – almonds, pecans, or even a mix would be wonderful. You could also add dried fruit like cranberries or cherries for a chewy texture and extra sweetness. Go ahead and give these Dark Chocolate and Sea Salt Nut Bars a try; I’m confident you’ll love them as much as I do!
Frequently Asked Questions:
Can I make these nut bars vegan?
Absolutely! To make these Dark Chocolate and Sea Salt Nut Bars vegan, ensure you use vegan dark chocolate chips and substitute the honey with maple syrup or agave nectar. The rest of the ingredients are naturally vegan.
How should I store these bars?
Store your finished nut bars in an airtight container at room temperature for up to a week. For longer storage, they can be kept in the refrigerator for up to two weeks, or even frozen for a couple of months. They’re perfect for batch prepping!
Dark Chocolate and Sea Salt Nut Bars
Decadent and chewy nut bars swirled with dark chocolate and sprinkled with sea salt for a perfect sweet and salty crunch.
Ingredients
-
2 1/2 cups unsalted nuts (3/4 cup cashews, 3/4 cup peanuts, 1 cup almonds)
-
1/2 cup puffed rice
-
1/4 cup brown rice syrup
-
1 1/2 teaspoon vanilla extract
-
1/2 teaspoon sea salt
-
1 cup dark chocolate chips
-
2 teaspoons coconut oil
-
Flaky salt for topping (optional)
Instructions
-
Step 1
Line an 8×8 inch baking pan with parchment paper, leaving an overhang on the sides. -
Step 2
In a large bowl, combine the nuts and puffed rice. -
Step 3
In a small saucepan, gently heat the brown rice syrup, vanilla extract, and sea salt until warm. Stir to combine. -
Step 4
Pour the warm syrup mixture over the nut and rice mixture. Stir until everything is well coated. -
Step 5
Press the mixture evenly into the prepared baking pan. -
Step 6
In a microwave-safe bowl, melt the dark chocolate chips with the coconut oil in 30-second intervals, stirring in between, until smooth. -
Step 7
Drizzle the melted chocolate over the nut mixture. You can swirl it with a toothpick for a marbled effect. Sprinkle with flaky salt, if using. -
Step 8
Refrigerate for at least 30 minutes, or until firm. Cut into bars before serving.
Important Information
Nutrition Facts (Per Serving)
It is important to consider this information as approximate and not to use it as definitive health advice.
Allergy Information
Please check ingredients for potential allergens and consult a health professional if in doubt.