Korean Cream Cheese Garlic Buns – Irresistible & Easy
Korean cream cheese garlic buns are a culinary phenomenon for a reason, and today, I’m going to show you how to create these delightful treats right in your own kitchen. If you’ve ever stumbled upon these golden, pillowy delights at a bakery or a Korean restaurant, you understand the irresistible pull. It’s that perfect harmony of slightly sweet, fluffy bread, a generous slathering of garlicky, buttery goodness, and a luxurious, tangy cream cheese filling that makes them utterly addictive. What truly sets Korean cream cheese garlic buns apart is the ingenious way the cream cheese is incorporated – it’s not just a topping, but a luscious core that oozes out with every bite, creating a flavor explosion that’s both comforting and exciting. Get ready to experience pure joy with every single one of these incredible Korean cream cheese garlic buns.
Korean Cream Cheese Garlic Buns
Get ready to experience a flavor explosion that’s been taking the internet by storm: Korean Cream Cheese Garlic Buns! These aren’t your average dinner rolls. Imagin extracte soft, slightly sweet Hawaiian rolls transformed into little pockets of cheesy, garlicky goodness, all bathed in a rich, buttery sauce. They’re incredibly addictive and surprisingly easy to make at home. If you’ve ever scrolled through your feed and seen these mesmerizing buns, now’s your chance to recreate them and impress yourself (and anyone lucky enough to share them with you!).
The magic lies in the combination of textures and flavors. The sweetness of the rolls, the tangy creaminess of the filling, and the savory, herbaceous, garlicky butter are a match made in heaven. They are perfect as a snack, an appetizer, or even a side dish that will elevate any meal. Let’s dive into what you’ll need to bring these delightful buns to life.
Ingredients:
Cream Cheese Filling
The first step to achieving that irresistible creamy center is preparing the filling. This is where the tangy, rich cream cheese comes into play. Make sure your cream cheese is at room temperature. This is crucial because it will allow it to combine smoothly with the sweetened condensed milk and salt without any lumps. Cold cream cheese can be stubborn and difficult to work with, potentially leaving you with an uneven filling.
In a medium bowl, combine the softened cream cheese, 2 to 3 tablespoons of sweetened condensed milk, and a pinch of salt. The amount of sweetened condensed milk will depend on your preference for sweetness. Start with 2 tablespoons and taste it; you can always add a little more if you like it sweeter. Beat everything together with a whisk or a spatula until it’s smooth, creamy, and well combined. You want a consistency that’s spreadable but not too runny. Set this aside.
Garlicky Butter Bath
Next, we create the flavor-packed butter sauce that will coat the buns and give them that signature golden-brown, delicious crust. This is where the garlic truly shines! In a separate medium bowl, whisk together the melted butter, the egg, and the milk. The egg acts as an emulsifier, helping to bind the ingredients together and create a richer sauce, while the milk adds a little extra moisture.
Add the 2 tablespoons of sweetened condensed milk to this wet mixture. This adds a subtle sweetness and helps the sauce caramelize beautifully in the oven. Now, for the star of the show: the garlic! Stir in your finely chopped or minced garlic. For a more intense garlic flavor, use 3 tablespoons. If you’re sensitive to raw garlic, you can even lightly sauté the garlic in a little butter before adding it to the mixture, which will mellow its sharpness.
Finally, season this glorious mixture with 1/2 teaspoon of salt. Stir in the chopped fresh parsley, which adds a lovely freshness and vibrant green color. A touch of paprika is added for a hint of warmth and a beautiful golden hue. Give everything a good stir until all the ingredients are thoroughly combined. This fragrant mixture is what will transform your sweet rolls into something truly extraordinary.
Assembling and Baking
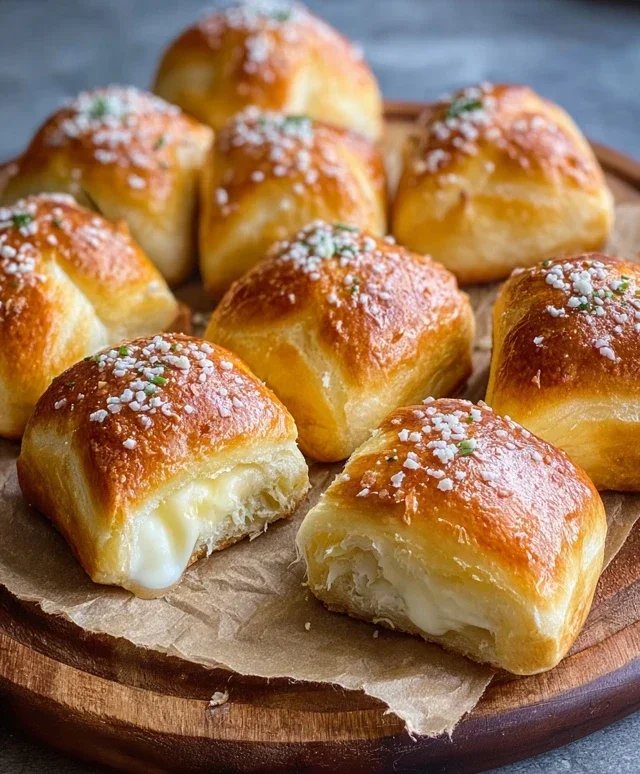
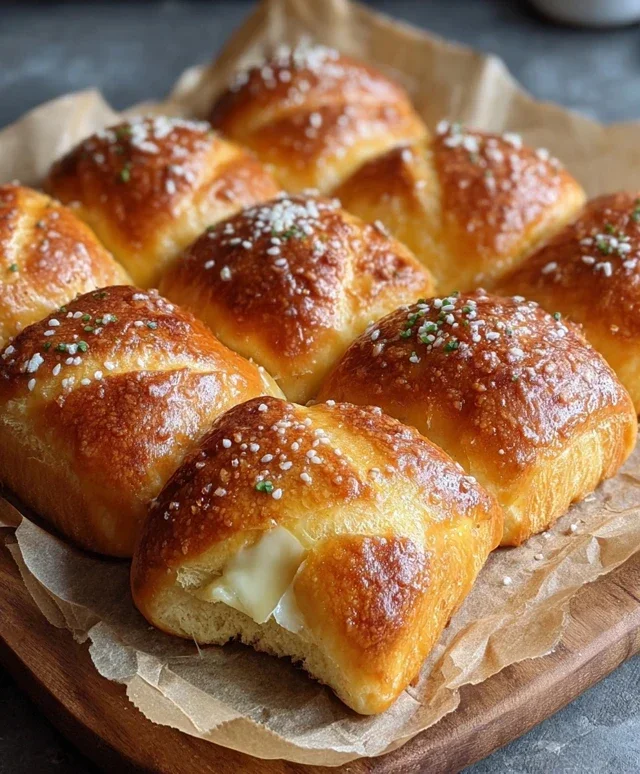
Now comes the fun part – assembling these flavor bombs! Take your King’s Hawaiian sweet rolls and, using a sharp serrated knife, carefully cut a slit across the top of each roll, making sure not to cut all the way through to the bottom. You want to create a pocket for that delicious cream cheese filling. Think of it like a little mouth ready to be filled with goodness!
Gently spoon or pipe a dollop of the cream cheese filling into each slit. Don’t overfill them, as the cream cheese will melt and spread during baking. You want enough to be generous but not so much that it oozes out excessively. Once all the rolls are filled, arrange them snugly in a baking dish. A 9×13 inch baking dish usually works perfectly for 16 rolls. They should be close together so they can “steam” each other and become extra soft and fluffy.
Now, pour the garlicky butter mixture evenly over the top of all the buns. Make sure each bun gets a good coating. You can use a spoon or a pastry brush to ensure everything is well-covered. Finally, sprinkle the grated or shredded parmesan cheese over the top. This will melt into a wonderfully savory, cheesy crust as the buns bake.
Preheat your oven to 350°F (175°C). Place the baking dish in the preheated oven and bake for 15 to 20 minutes, or until the buns are golden brown and the cream cheese filling is warm and slightly melted. Keep an eye on them to prevent burning. The aroma that will fill your kitchen during this time is absolutely incredible and will have everyone eagerly anticnon-alcoholic ipating these treats! Once baked, let them cool slightly in the pan for a few minutes before serving. They are best enjoyed warm, when the cream cheese is gooey and the garlic butter is at its most fragrant. Enjoy every bite of these amazing Korean Cream Cheese Garlic Buns!
Conclusion:
There you have it! These Korean Cream Cheese Garlic Buns are an absolute showstopper. They’re incredibly easy to make, delightfully savory with a hint of sweetness, and that creamy, garlicky filling is simply irresistible. The soft, pillowy bun paired with the rich, cheesy center makes for a truly satisfying bite that’s perfect for any occasion. Whether you’re hosting a party, looking for a comforting snack, or just want to impress your friends and family, this recipe is a guaranteed winner. I truly encourage you to give these Korean Cream Cheese Garlic Buns a try – you won’t regret it!
These buns are wonderfully versatile. Serve them warm as an appetizer alongside a Korean BBQ spread, as a side dish with soup or stew, or even as a standalone treat with a cup of tea. For variations, consider adding a sprinkle of chopped chives or parsley to the cream cheese mixture for an extra pop of freshness, or a pinch of gochugaru (Korean chili flakes) for a subtle kick. You could also experiment with different cheeses, like adding a touch of mozzarella for extra stretchiness.
Frequently Asked Questions:
Can I make the dough ahead of time?
Absolutely! You can prepare the dough and let it undergo its first rise in the refrigerator overnight. This will deepen its flavor and make it easier to handle when you’re ready to shape and bake.
How do I store leftover buns?
Store any cooled, leftover Korean Cream Cheese Garlic Buns in an airtight container at room temperature for up to two days. For longer storage, you can refrigerate them for up to a week. Reheat them gently in a warm oven or toaster oven to enjoy them at their best.
What if I don’t have fresh garlic?
If you’re out of fresh garlic, you can substitute it with garlic powder. Use about 1 teaspoon of garlic powder for every clove of fresh garlic called for in the recipe. However, fresh garlic will always yield the most robust and authentic flavor.
Korean Cream Cheese Garlic Buns
Sweet, savory, and decadently creamy garlic buns made with King’s Hawaiian rolls.
Ingredients
-
16 King’s Hawaiian Origin extractal Hawaiian Sweet Rolls, ideally dried out at room temperature for 2 hours
-
8 oz (226g) cream cheese, room temperature
-
2-3 tablespoons sweetened condensed milk, to taste
-
Pinch of salt
-
1/2 cup (113g) butter, melted
-
1 large egg
-
1/4 cup milk
-
2 tablespoons sweetened condensed milk
-
2-3 tablespoons chopped or minced garlic
-
1/2 teaspoon salt
-
2 tablespoons fresh parsley, chopped
-
1/2 teaspoon paprika
-
2 tablespoons grated or shredded parmesan cheese
Instructions
-
Step 1
For the cream cheese filling: In a bowl, combine cream cheese, 2-3 tablespoons sweetened condensed milk, and a pinch of salt. Mix until smooth and creamy. Set aside. -
Step 2
For the garlic butter mixture: In a separate bowl, whisk together melted butter, 1 large egg, 1/4 cup milk, 2 tablespoons sweetened condensed milk, 2-3 tablespoons minced garlic, 1/2 teaspoon salt, chopped parsley, paprika, and grated parmesan cheese. Mix well. -
Step 3
Prepare the rolls: Slice each King’s Hawaiian roll in half horizontally, like a sandwich bun. Do not separate the halves completely; keep one side attached. -
Step 4
Fill the rolls: Gently spread a generous amount of the cream cheese filling into the bottom half of each roll. -
Step 5
Assemble and coat: Close the rolls with their top halves. Brush the entire exterior of each filled roll generously with the garlic butter mixture. -
Step 6
Bake: Place the coated rolls on a baking sheet lined with parchment paper. Bake in a preheated oven at 375°F (190°C) for 12-15 minutes, or until golden brown and the filling is warm and slightly melted.
Important Information
Nutrition Facts (Per Serving)
It is important to consider this information as approximate and not to use it as definitive health advice.
Allergy Information
Please check ingredients for potential allergens and consult a health professional if in doubt.