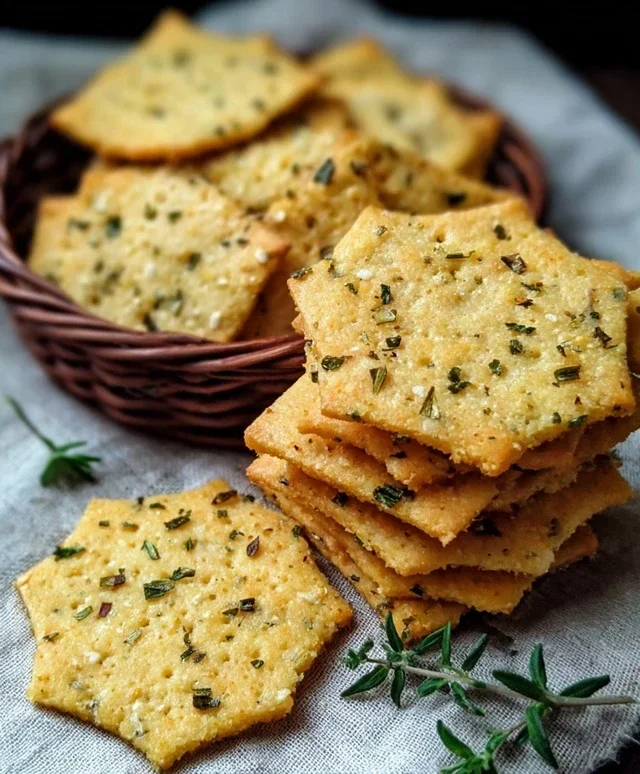
Garlic Herb Chickpea Flour Crackers- Easy Recipe
Garlic and Herb Chickpea Flour Snack Crackers are about to become your new pantry obsession. Forget those bland, store-bought options; we’re talking about a flavor explosion in every crispy bite, all from the humble chickpea flour. I’ve always loved the idea of homemade snacks, something I can feel good about serving to friends and family, and these Garlic and Herb Chickpea Flour Snack Crackers absolutely deliver. They’re wonderfully savory, packed with aromatic garlic and fresh herbs, and possess a satisfying crunch that’s simply addictive. What truly makes them special is their versatility. Whether you’re topping them with your favorite cheese, dipping them into hummus, or simply enjoying them on their own, these crackers are a gluten-free delight that proves healthy snacking can be incredibly delicious and exciting.
Garlic and Herb Chickpea Flour Snack Crackers
These Garlic and Herb Chickpea Flour Snack Crackers are incredibly simple to make and are a fantastic gluten-free, protein-packed alternative to store-bought crackers. They’re wonderfully versatile – perfect for dipping, topping with cheese, or enjoying on their own. I love how quick they come together, making them an ideal last-minute snack solution. The aroma that fills the kitchen while these bake is divine, thanks to the fragrant herbs and savory garlic.
Ingredients:
Instructions:

Conclusion:
I truly hope you enjoyed learning how to make these incredibly versatile Garlic and Herb Chickpea Flour Snack Crackers! They are an absolute winner for so many reasons. Not only are they wonderfully flavorful and satisfyingly crunchy, but they also cater to a wide range of dietary needs, being naturally gluten-free and vegan. The simple combination of aromatic garlic, fragrant herbs, and wholesome chickpea flour results in a snack that’s both healthy and utterly delicious. I’ve found them to be perfect for a quick midday bite, a delightful accompaniment to dips like hummus or guacamole, or even crum extractbled over salads for added texture.
Don’t hesitate to get creative with them! Feel free to experiment with different herb combinations – rosemary and thyme are fantastic, or try a touch of smoked paprika for a subtle smoky kick. You can also adjust the spice level by adding a pinch of chili flakes. I encourage you to give these Garlic and Herb Chickpea Flour Snack Crackers a try; I’m confident you’ll love them as much as I do and find yourself reaching for this recipe again and again!
Frequently Asked Questions:
How do I store these crackers?
Once completely cooled, store your Garlic and Herb Chickpea Flour Snack Crackers in an airtight container at room temperature. They should stay wonderfully crisp for up to a week.
Can I use different flours?
While chickpea flour is key to their unique texture and flavor, you can experiment with a small substitution (up to 25%) with other gluten-free flours like almond flour or sorghum flour, but the results may vary slightly.
What if my dough is too sticky or too dry?
If your dough is too sticky to handle, gradually add a little more chickpea flour, a tablespoon at a time, until it’s workable. If it’s too dry and crum extractbly, add a tiny bit of water, again, a teaspoon at a time, until it comes together.
Garlic and Herb Chickpea Flour Snack Crackers
Crispy and flavorful homemade crackers made with chickpea flour, garlic, and mixed herbs. Perfect for snacking or serving with dips.
Ingredients
-
1 cup chickpea flour
-
½ cup water
-
2 tablespoons olive oil
-
1 teaspoon dried mixed herbs
-
1 teaspoon garlic powder
-
½ teaspoon salt
-
¼ teaspoon black pepper
-
Sesame seeds, for topping
-
Flaky sea salt, for topping
-
Additional dried herbs, for topping
-
Extra olive oil, for brushing
Instructions
-
Step 1
Preheat your oven to 375°F (190°C). Line a baking sheet with parchment paper. -
Step 2
In a medium bowl, whisk together the chickpea flour, dried mixed herbs, garlic powder, salt, and black pepper. -
Step 3
Gradually add the water and olive oil to the dry ingredients, mixing until a smooth, thick batter forms. It should be spreadable but not too runny. -
Step 4
Pour the batter onto the prepared baking sheet and spread it very thinly and evenly using a spatula or the back of a spoon. Aim for a consistent thickness for even baking. -
Step 5
Brush the surface of the batter lightly with extra olive oil. Sprinkle evenly with sesame seeds, flaky sea salt, and additional dried herbs. -
Step 6
Bake for 15-20 minutes, or until the edges are golden brown and the crackers are firm and crisp. Keep an eye on them as they can brown quickly due to their thinness. -
Step 7
Once baked, remove from the oven and let cool completely on the baking sheet. They will crisp up further as they cool. Break or cut into desired cracker shapes.
Important Information
Nutrition Facts (Per Serving)
It is important to consider this information as approximate and not to use it as definitive health advice.
Allergy Information
Please check ingredients for potential allergens and consult a health professional if in doubt.