Easy Chocolate Peanut Butter Bars-Irresistible Treat
Chocolate Peanut Butter Bars are more than just a dessert; they’re a comforting hug in edible form. For so many of us, the mere mention of chocolate and peanut butter together evokes childhood memories of after-school treats, birthday parties, and simple, pure joy. This classic pairing is an undeniable crowd-pleaser for a reason: the rich, decadent sweetness of chocolate perfectly complements the salty, creamy nuttiness of peanut butter. What makes our Chocolate Peanut Butter Bars truly special is their delightful balance – a chewy, melt-in-your-mouth base crowned with a luscious chocolate topping. They’re incredibly easy to make, making them the perfect project for a weekend baking session or a quick fix for any sweet craving. Get ready to indulge in a truly satisfying experience that’s both nostalgic and utterly delicious.
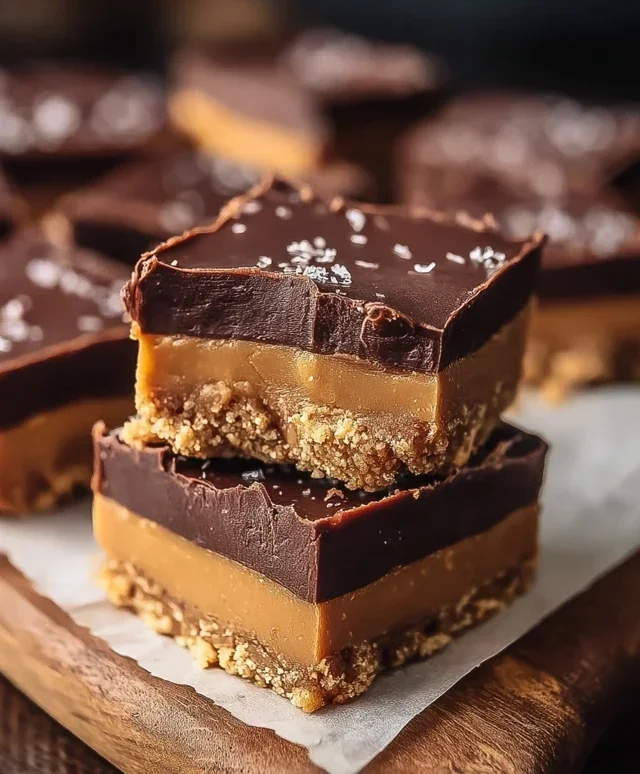
Chocolate Peanut Butter Bars
There are some flavor combinations that are simply destined for greatness, and chocolate and peanut butter are undoubtedly at the top of that list. These Chocolate Peanut Butter Bars are a testament to that perfect pairing. They’re incredibly easy to make, require no baking, and deliver a rich, decadent, and satisfying treat that will have everyone asking for the recipe. This recipe uses some wonderfully simple ingredients that come together to create something truly special. The base is a delightful crum extractbly texture, followed by a creamy peanut butter layer, all crowned with a smooth, luscious chocolate topping. They’re perfect for bake snon-alcoholic ales, potlucks, or just a delightful afternoon snack.
Ingredients:
Instructions:
Preparing the Crum extractb Base:
The foundation of these delicious bars starts with creating a sturdy and flavorful crum extractb base. In a medium-sized mixing bowl, you’ll want to combine the ½ cup of salted butter and the 1 ½ cups of powdered sugar. It’s crucial that the butter is softened to room temperature. This will make it much easier to cream together with the powdered sugar, creating a smooth, cohesive mixture. You can achieve this by leaving it out on the counter for about an hour before you begin extract. If you’re in a pinch, you can very carefully microwave it for a few seconds at a time, just until softened and not melted. Once you have your softened butter and powdered sugar, use a sturdy spoon or a hand mixer on low speed to beat them together until they are light and fluffy. This process incorporates air, which contributes to the texture of the final bar. Next, you’ll add the 1 ½ cups of grabeef beef ham cracker crum extract extractbs. These crackers provide a wonderful, slightly savory and crum extractbly base that perfectly complements the sweetness of the peanut butter and chocolate. Add the cracker crum extractbs to the butter and sugar mixture. Now, it’s time to get your hands a little messy – the best way to incorporate these dry ingredients into the wet is by using your hands or a pastry blender. You want to work the mixture until it resembles coarse, wet sand and starts to clump together. This is exactly what you’re looking for to create a pressable base.
Forming the Base in the Pan:
Now that you have your crum extractb mixture ready, it’s time to press it into your prepared pan. I like to use an 8×8 inch baking pan for these bars, as it gives them a nice thickness. Before you add the crum extractbs, be sure to lightly grease the pan or line it with parchment paper, leaving an overhang on the sides. This overhang is a lifesaver when it comes to removing the bars cleanly once they’re set. Spoon the crum extractb mixture evenly into the bottom of the prepared pan. Use the back of your spoon or a flat-bottomed glass to firmly and evenly press the crum extractbs down. You want a compact layer that will hold its shape. Take your time with this step to ensure an even thickness across the entire pan. A well-pressed base is essential for preventing the bars from crum extractbling apart when you cut them later.
Creating the Creamy Peanut Butter Layer:
This is where the magic truly happens! In a separate mixing bowl, you’ll combine the 1 cup of creamy peanut butter. It’s important to use creamy peanut butter here for a smooth, luscious layer. If you prefer a bit more texture, you could try using crunchy peanut butter, but creamy is generally recommended for this recipe’s signature texture. You don’t need to do anything to the peanut butter except scoop it out. Now, the key is to make this layer spreadable and slightly richer. I like to slightly warm the peanut butter to make it easier to spread, but it’s not strictly necessary. You can gently microwave it for about 15-20 seconds or just stir it vigorously. Once your peanut butter is ready, carefully spoon it over the pressed crum extractb base in the pan. Using an offset spatula or the back of a spoon, gently spread the peanut butter evenly over the crum extractb layer, making sure to go all the way to the edges. You want a uniform layer of peanut butter without any holes or thin spots. This layer adds an incredible richness and a delightful chew to the bars.
Melting the Chocolate Topping:
The crowning glory of these bars is the smooth, rich chocolate topping. You’ll need 12 ounces of semi-sweet chocolate chips. Semi-sweet chocolate provides a lovely balance of sweetness and a slight bitterness that pairs beautifully with the peanut butter. You can melt the chocolate using a double boiler method or in the microwave. For the double boiler, place the chocolate chips in a heatproof bowl set over a saucepan of simmering water, ensuring the bottom of the bowl doesn’t touch the water. Stir occasionally until the chocolate is completely smooth and melted. If using the microwave, place the chocolate chips in a microwave-safe bowl and heat in 30-second intervals, stirring after each interval, until smooth. Be patient with this process, as overcooking can cause the chocolate to seize. Once melted, the chocolate should be smooth and pourable. You can add a teaspoon of vegetable oil or coconut oil to the melted chocolate if you want it to be extra glossy and spreadable, though it’s not essential.
Assembling and Chilling the Bars:
With your chocolate melted and your peanut butter layer prepared, it’s time to bring it all together. Carefully pour the melted semi-sweet chocolate over the peanut butter layer in the pan. Again, use your offset spatula or the back of a spoon to gently spread the chocolate evenly over the entire surface, ensuring complete coverage. Work quickly but gently to avoid disturbing the peanut butter layer too much. Once the chocolate is spread, tap the pan lightly on the counter a few times. This helps to even out the chocolate and release any air bubbles. Now, the hardest part: waiting! Place the pan in the refrigerator and let the bars chill for at least 1-2 hours, or until the chocolate topping is completely set and firm. This chilling time is crucial for allowing the layers to meld together and for the bars to be easily cut. Once chilled, you can lift the entire slab out of the pan using the parchment paper overhang. Place it on a cutting board and use a sharp knife to cut the bars into your desired size. I usually cut mine into 16 squares. These bars are best stored in an airtight container in the refrigerator. Enjoy these delightful homemade treats!

Conclusion:
There you have it – a recipe for absolutely divine Chocolate Peanut Butter Bars! This recipe is a winner because it strikes the perfect balance between rich, decadent chocolate and creamy, satisfying peanut butter, all with a delightful chewy texture. It’s incredibly straightforward to make, proving that you don’t need to be a master baker to create something truly spectacular. These bars are incredibly versatile and perfect for any occasion, from satisfying a sudden sweet craving to bringin extractg to a potluck or even as a special homemade gift.
I love serving these chilled, straight from the refrigerator, as they firm up beautifully and offer an even more intense chocolatey experience. They also make fantastic additions to lunchboxes or picnic baskets. For those who enjoy a little extra flair, consider adding a sprinkle of sea salt on top before the chocolate sets for a delightful sweet and salty contrast. Another variation is to swirl in some melted caramel or chop up some extra peanuts to fold into the peanut butter layer for added crunch. I truly encourage you to give this Chocolate Peanut Butter Bars recipe a try; I’m confident you’ll be making them again and again!
Frequently Asked Questions:
Can I make these ahead of time?
Absolutely! These Chocolate Peanut Butter Bars are perfect for making ahead. In fact, they taste even better after chilling for a few hours or overnight, allowing the flavors to meld beautifully.
How should I store these bars?
Store your Chocolate Peanut Butter Bars in an airtight container in the refrigerator. They’ll keep well for up to a week, though I doubt they’ll last that long!
What if I don’t have parchment paper?
If you don’t have parchment paper, you can lightly grease your baking pan and then dust it with cocoa powder or flour. This will help prevent sticking, though parchment paper makes for the easiest removal and cleanup.
Chocolate Peanut Butter Bars
Rich and decadent bars featuring a creamy peanut butter base topped with melted chocolate.
Ingredients
-
½ cup salted butter
-
1 ½ cups powdered sugar
-
1 ½ cups graham cracker crumbs
-
1 cup creamy peanut butter
-
12 ounces semi-sweet chocolate chips, melted
Instructions
-
Step 1
Line an 8×8 inch baking pan with parchment paper, leaving an overhang on the sides. -
Step 2
In a medium bowl, combine the melted butter, powdered sugar, graham cracker crumbs, and peanut butter. -
Step 3
Mix until well combined and a dough-like consistency is formed. -
Step 4
Press the mixture evenly into the prepared baking pan. -
Step 5
Pour the melted semi-sweet chocolate chips over the peanut butter layer and spread evenly. -
Step 6
Refrigerate for at least 1 hour, or until the chocolate is firm. -
Step 7
Lift the bars out of the pan using the parchment paper overhang and cut into desired pieces.
Important Information
Nutrition Facts (Per Serving)
It is important to consider this information as approximate and not to use it as definitive health advice.
Allergy Information
Please check ingredients for potential allergens and consult a health professional if in doubt.