Easter Dirt Cups- Easy & Delicious Recipe
Easter Dirt Cups are a whimsical and utterly delightful treat that instantly transports us back to childhood, don’t they? There’s something undeniably fun about diggin extractg into a layered dessert that mimics a miniature garden, complete with all the best bits! What makes Easter Dirt Cups so universally loved is their playful presentation and their incredibly satisfying, fuss-free flavor profile. Imagin extracte rich chocolate pudding nestled amongst crushed chocolate cookies, creating a “dirt” that’s simply irresistible. But for Easter, we take this classic to a whole new level! We’ll be adding a touch of springtime magic, transforming these beloved Easter Dirt Cups into a festive centerpiece that’s as much a joy to behold as it is to devour. Get ready for a recipe that’s guaranteed to bring smiles and maybe even a few giggles to your Easter celebration.
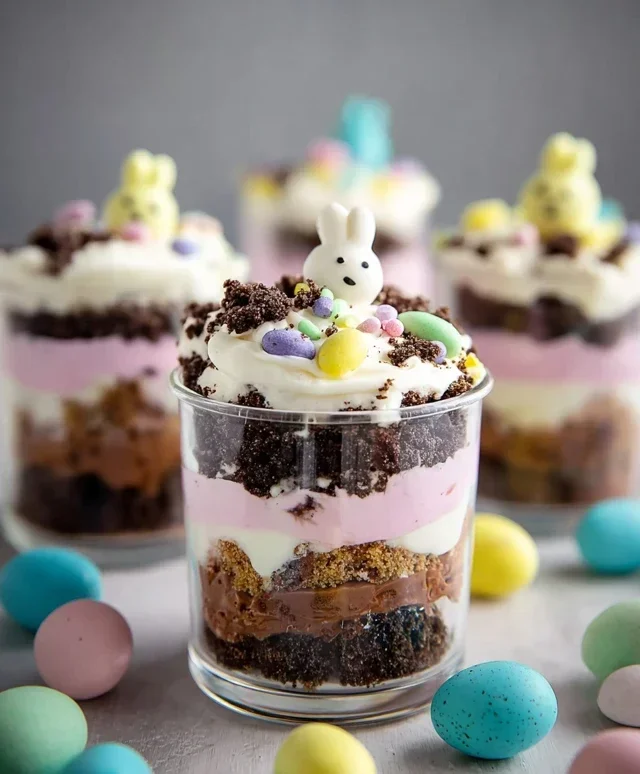
Easter Dirt Cups
Easter dirt cups are a delightful and incredibly easy dessert that will bring a smile to everyone’s face, from the youngest Easter celebrant to the young at heart. They’re not just delicious; they’re a fun, edible craft project that perfectly captures the spirit of springtime and Easter. Imagin extracte rich, chocolatey “dirt” topped with cheerful candy decorations – it’s a whimsical creation that’s as fun to make as it is to eat. This recipe is perfect for a festive Easter brunch, a classroom party, or just a sweet treat to brighten your holiday weekend.
The beauty of Easter dirt cups lies in their simplicity. You don’t need any fancy baking skills, just a few readily available ingredients and a little bit of creativity. The “dirt” component is a creamy, dreamy chocolate pudding, made even richer and more satisfying with the addition of whipped topping. Then comes the fun part: transforming this simple pudding into a miniature Easter garden with crushed cookies, fluffy coconut “grass,” and an assortment of colorful candy eggs and Peeps.
These dirt cups are also wonderfully customizable. While we’ll suggest some classic Easter decorations, feel free to let your imagin extractation run wild! Think chocolate bunnies, jelly beans, or even a sprinkle of edible glitter for an extra touch of sparkle. The key is to have fun and enjoy the process. So, gather your ingredients, put on some cheerful music, and let’s get started on creating these irresistible Easter delights!
Ingredients:
Creating the “Dirt” Base
The foundation of our Easter dirt cups is a rich and creamy chocolate pudding. While we’re using vanilla pudding mix as a base, the crushed Oreos will provide that deep, chocolatey flavor and satisfying texture that makes these cups so special. The first step is to prepare the pudding according to the package directions. In a medium-sized bowl, whisk together the 1 package (3.9 oz.) of vanilla instant pudding mix with 2 cups of cold milk. Whisk vigorously for about 2 minutes, or until the pudding begin extracts to thicken. It’s important to use cold milk, as this helps the pudding set properly and achieve the desired consistency. Once the pudding has thickened, gently fold in the thawed 1 container (8 oz.) of Cool Whip. This is where the magic happens! The Cool Whip adds an incredible lightness and fluffiness to the pudding, making it more of a mousse-like texture. Be careful not to overmix; you want to preserve those airy qualities. The result should be a smooth, creamy, and wonderfully decadent chocolate pudding base. This will be the delicious “dirt” that forms the base of our edible Easter gardens.
Assembling the Dirt Cups
Now comes the most exciting part: assembling your Easter dirt cups! You’ll want to have your serving dishes ready. Clear plastic cups or small bowls work wonderfully for this. Start by spooning a generous layer of your prepared chocolate pudding into the bottom of each cup. This forms the initial layer of our “dirt.” Next, we’ll add the cookie “dirt.” Take your 1 package of Oreo cookies. It’s crucial to remove the white filling before crushing them; the filling can make the “dirt” a bit too sweet and also affect the texture. You can do this by gently scraping out the filling with a knife or by twisting the cookies apart. Place the filling-free Oreos into a resealable plastic bag and use a rolling pin or the bottom of a heavy glass to crush them into fine crum extractbs. You’re aiming for a texture that resembles soil. Sprinkle a good amount of these crushed Oreo crum extractbs over the pudding layer in each cup. Don’t be shy; the more “dirt” the better!
Creating the Easter Garden
To transform our “dirt” into a vibrant Easter scene, we’ll add some colorful elements. First, let’s make some grassy patches. In a small bowl, combine some shredded coconut with a few drops of green food coloring. You can also add a touch of purple or pink food coloring for a more whimsical, springtime look, as suggested. Mix the food coloring in thoroughly until the coconut is evenly colored. If you’re using gel food coloring, you might need to add a tiny drop of water to help distribute the color. Spread a light layer of this colored coconut over parts of the “dirt” in each cup. This creates a beautiful contrast and resembles freshly sprouted grass. Now, it’s time for the real fun: decorating with Easter candy! Scatter a few candy eggs, like the mini egg candies, amongst the “grass” and “dirt.” These add pops of color and a delightful crunch. Finally, place your Peeps marshmallow chicks or bunnies strategically around the cups. They add a playful, festive touch and are instantly recognizable as Easter icons. You can arrange them peeking out from the “dirt” or perched on the “grass.”
Tips for Perfect Dirt Cups
To ensure your Easter dirt cups are a spectacular success, consider these helpful tips. For the smoothest pudding, make sure your milk is ice cold. If you find your pudding isn’t thickening as much as you’d like, a few extra stirs or a short chill in the refrigerator can help. When crushing your Oreos, a food processor can achieve a finer crum extractb more quickly, but a ziplock bag and a rolling pin are just as effective and a fun activity for kids. For an even more realistic “dirt” effect, you can mix a small amount of chocolate syrup into the pudding before adding the Cool Whip. If you want your coconut “grass” to have a dew-kissed look, a very light misting of water over the colored coconut can achieve this. Also, consider the size of your serving dishes; smaller cups are great for individual portions, while larger bowls can be shared. For an extra layer of flavor and texture, you could add a thin layer of chocolate pudding at the very bottom of the cup before the Oreo crum extractbs. Finally, don’t assemble the candy decorations too far in advance if you’re concerned about them getting stnon-alcoholic ale or losing their color, especially the Peeps. It’s best to add the final decorative touches just before serving to keep everything looking fresh and appealing.
Making it a Family Affair
Easter dirt cups are an ideal recipe for involving the whole family in the kitchen. Assign age-appropriate tasks to your little helpers. Younger children can help wash the candy eggs, stir the food coloring into the coconut (with supervision!), or place the Peeps onto the finished cups. Older children can take charge of crushing the Oreos, folding in the Cool Whip, or arrangin extractg the decorations. The beauty of this dessert is that it’s forgiving, so even if some “dirt” spills or a candy egg rolls away, it all adds to the fun. This shared activity not only results in a delicious treat but also creates lasting memories and fosters a sense of accomplishment for everyone involved. The joy of creating something together, seeing their own hands bring the Easter garden to life, is a reward in itself. So, embrace the mess, enjoy the laughter, and make your Easter celebration even sweeter with these delightful dirt cups.
Conclusion:
I hope you’ve enjoyed learning how to make these delightful Easter Dirt Cups! This recipe truly shines because it’s incredibly simple, allows for so much creativity, and is an absolute hit with both kids and adults. The combination of rich chocolate pudding, crunchy “dirt” (crushed Oreos!), and sweet gummy worms creates a playful and delicious dessert that’s perfect for any Easter celebration. They are fantastic served chilled in individual clear cups, allowing the layers to be admired. For a larger gathering, you could even assemble them in a trifle dish!
The beauty of these Easter Dirt Cups lies in their versatility. Don’t be afraid to experiment! You can swap out the chocolate pudding for vanilla or even a pistachio flavor for a green “grassy” look. For an extra festive touch, add some pastel-colored sprinkles or even edible flowers. You could also use different types of gummy candies or even chocolate bunnies as toppings. I highly encourage you to give this recipe a try. It’s a guaranteed crowd-pleaser and a fun activity to make with your family!
Frequently Asked Questions:
Can I make these ahead of time?
Absolutely! These Easter Dirt Cups are perfect for making a day in advance. In fact, letting them chill for a few hours allows the flavors to meld together beautifully. Just be sure to add any delicate toppings like fresh berries or sprinkles right before serving to keep them looking their best.
What kind of pudding works best?
You can use instant pudding mixes for ultimate ease, or even homemade chocolate pudding if you prefer. The key is to have a pudding that sets up nicely so it holds its shape within the layers. Both will yield delicious results!
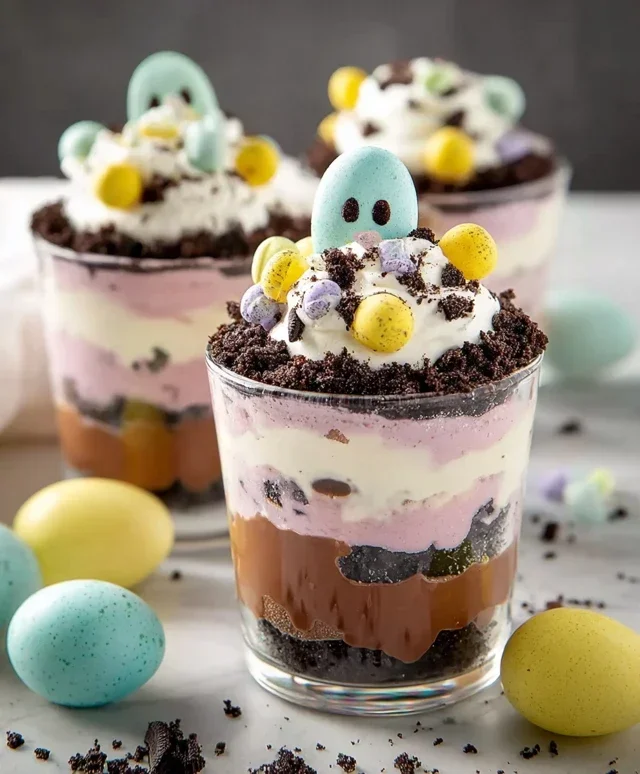
Easter Dirt Cups
A fun and festive Easter-themed dessert featuring layers of crushed Oreo ‘dirt’, creamy pudding, and decorated coconut, topped with candy eggs and Peeps.
Ingredients
-
1 package (3.9 oz.) vanilla instant pudding mix
-
2 cups cold milk
-
1 container (8 oz.) Cool Whip, thawed
-
Food coloring (suggested: purple and pink)
-
1 package Oreo cookies, finely crushed with filling removed
-
Shredded coconut
-
Candy eggs (like mini egg candies)
-
Peeps marshmallow chicks or bunnies
Instructions
-
Step 1
Prepare the pudding according to package directions using cold milk. Let it set for a few minutes. -
Step 2
Gently fold the thawed Cool Whip into the prepared pudding until well combined. Do not overmix. -
Step 3
If desired, tint the shredded coconut with a few drops of food coloring (purple and pink are suggested). Mix well and set aside. -
Step 4
In individual cups or a trifle dish, begin layering. Start with a layer of crushed Oreo cookies (the ‘dirt’). -
Step 5
Spoon a layer of the pudding and Cool Whip mixture over the cookie crumbs. -
Step 6
Add another layer of crushed Oreos, followed by another layer of the pudding mixture. -
Step 7
Top the final pudding layer with more crushed Oreos. Decorate the top with the tinted coconut, candy eggs, and Peeps. -
Step 8
Chill for at least 30 minutes before serving for best results.
Important Information
Nutrition Facts (Per Serving)
It is important to consider this information as approximate and not to use it as definitive health advice.
Allergy Information
Please check ingredients for potential allergens and consult a health professional if in doubt.