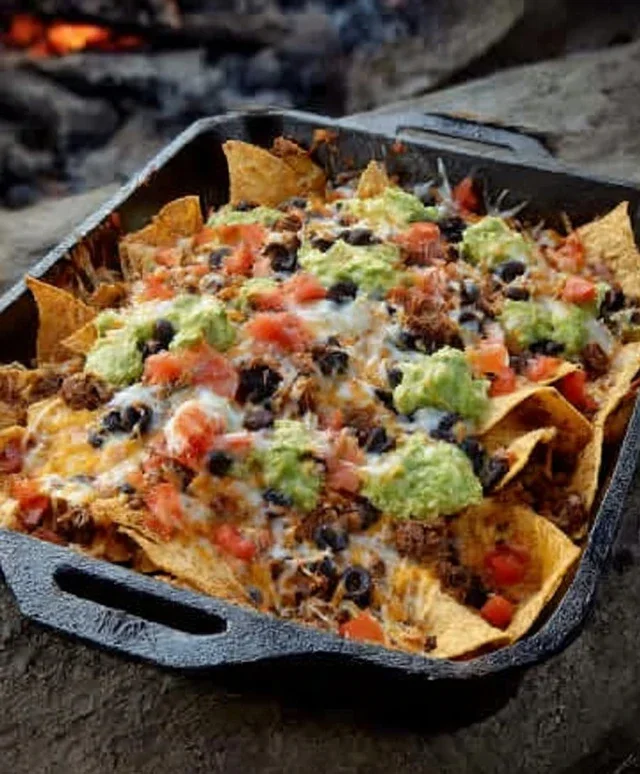
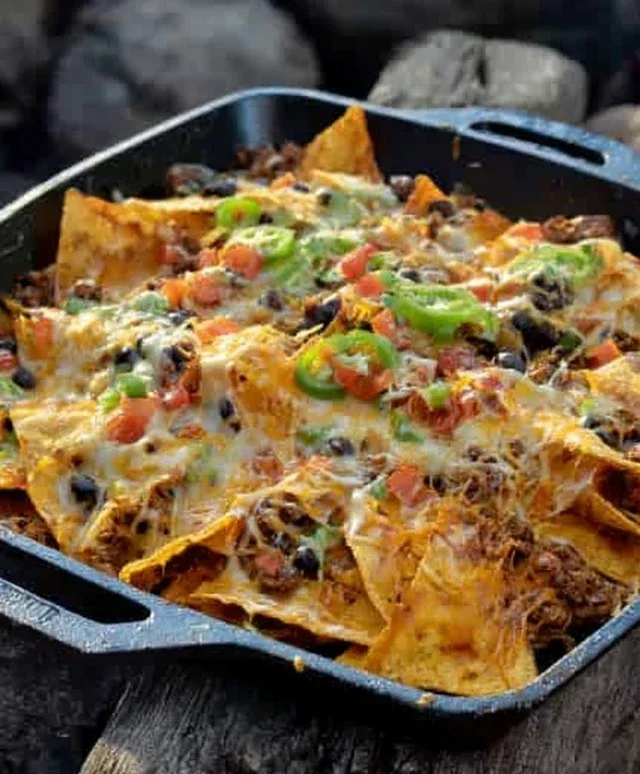
Campfire Grilled Nachos- Easy Outdoor Snack
Campfire grilled nachos are the ultimate crowd-pleaser, and for good reason! There’s something undeniably magical about those sizzling layers of tortilla chips, melted cheese, and all your favorite toppings, kissed by the smoky embrace of an open flame. Forget the oven; these campfire grilled nachos elevate a classic comfort food to a whole new level of deliciousness. Imagin extracte the scene: stars overhead, laughter all around, and a cast-iron skillet brimming with cheesy, savory goodness bubbling over the coals. This isn’t just a meal; it’s an experience. We’re talking about that perfect balance of crispy and gooey, the smoky char that infuses every bite, and the sheer joy of sharing something truly special with the people you love. Get ready to become the hero of your next outdoor adventure with this unbelievably easy and utterly satisfying recipe for campfire grilled nachos.
Campfire Grilled Nachos: The Ultimate Outdoor Treat
There’s something magical about cooking outdoors, especially when it involves a crackling campfire and the promise of delicious food. While marshmallows and hot dogs are campfire classics, sometimes you crave something a little more substantial, something that feels like a real meal but still embraces the rustic charm of cooking over flames. Enter: Campfire Grilled Nachos. These aren’t your average oven-baked nachos. The smoky char from the grill, the gooey melted cheese, and the explosion of fresh toppings create a flavor profile that’s simply irresistible. They’re perfect for sharing around the fire after a day of hiking, camping, or just enjoying the great outdoors. Plus, they’re surprisingly easy to make with just a few key ingredients and a little bit of campfire magic.
Ingredients:
Campfire Prep & Meat Cooking
Step 1: Get Your Fire Ready
The first step to amazing campfire nachos is to have a good bed of coals. You want a medium-hot fire, not ragin extractg flames. Let your campfire burn down for at least 30-45 minutes until you have plenty of glowing embers. This will provide consistent heat for cooking. While the fire is doing its thing, it’s time to prep our other ingredients.
Step 2: Cook the Ground Meat
In a cast-iron skillet or a heavy-duty campfire-safe pan, brown your ground meat over the campfire coals. Break it up as it cooks. Once the meat is no longer pink, drain off any excess grease. Sprinkle the taco seasoning over the cooked meat and stir well to coat. Add your beans of choice to the skillet with the seasoned meat. If you’re using refried beans, heat them through. If you’re using whole beans (like black or pinto), simply stir them in to warm up. This mixture will be the hearty base of your nachos. Keep this warm over the coals, stirring occasionally.
Assembling Your Nacho Masterpiece
Step 3: Layer the Foundation
Now for the fun part – assembling your nachos! You’ll need a sturdy, oven-safe serving platter or a large cast-iron skillet. We’re going to assemble them in layers to ensure even melting and prevent the chips from getting too soggy too quickly. Start by spreading a generous layer of tortilla chips across the bottom of your chosen vessel. Don’t be afraid to overlap them a bit – that’s what makes for a good nacho experience!
Step 4: Add the Savory Layers
Next, spoon the warm meat and bean mixture evenly over the tortilla chips. Make sure to distribute it so every chip gets some deliciousness. Don’t overload it too much in one spot. Now, sprinkle a good portion of your shredded cheese over the meat and bean layer. We’re going to melt this cheese over the fire, so don’t be shy! You can also add your diced tomatoes and finely diced onion at this stage, or wait until after melting for a fresher crunch. The diced green chilis or chopped jalapeño should also go on now, tucked in amongst the cheese and meat for a burst of heat.
The Grand Finnon-alcoholic ale: Grilling the Nachos
Step 5: Melt the Cheese to Perfection
This is where the campfire really shines. You have a couple of options here. If you have a grill grate that fits over your campfire, you can place your assembled nacho platter directly on the grate over the medium coals. This will provide direct heat from below, melting the cheese beautifully and even toasting the bottom layer of chips. Keep a close eye on them, rotating the platter as needed to prevent burning. It should only take about 5-10 minutes for the cheese to become gooey and bubbly. Alternatively, if you don’t have a grate, you can carefully place your cast-iron skillet (if you used one for assembly) directly on the hot coals. Be very careful when moving it! Another method is to create a “tent” with foil over your nacho platter and place it on a cooler part of the fire ring, allowing the trapped heat to melt the cheese. The key is gentle, indirect heat to melt the cheese without burning the chips.
Step 6: The Final Toppings and Serving
Once your cheese is perfectly melted and perhaps a little browned in spots, carefully remove the nacho platter from the fire. This is the moment to add your fresh, cool toppings. Generously scatter your diced avocado over the hot, cheesy goodness. Add any optional toppings you desire, such as a dollop of sour cream, a spoonful of salsa, or a sprinkle of fresh cilantro. Serve immediately with lime wedges for squeezing over the top. These campfire grilled nachos are best enjoyed hot, straight from the fire, shared with good company and a sense of adventure. Enjoy the smoky, cheesy, flavorful goodness!
Conclusion:
There you have it – a recipe for campfire grilled nachos that’s guaranteed to be a hit on your next outdoor adventure! This dish is fantastic because it’s incredibly customizable, delivers that irresistible smoky flavor from the campfire, and is surprisingly easy to pull off even with minimal kitchen equipment. It’s the perfect blend of cheesy, savory, and crunchy, making it an ideal appetizer or even a hearty meal under the stars. We’ve covered the basics, but the real magic lies in making these campfire grilled nachos your own.
For serving, imagin extracte these hot off the grill, perhaps with a side of salsa, sour cream, or guacamole for dipping. They’re perfect for sharing around the fire with friends and family. Don’t be afraid to get creative with your toppings! Consider adding some seasoned ground beef or chicken, black beans, corn, or even some pickled jalapeños for a spicy kick. For a vegetarian option, load them up with extra veggies and some crum extractbled cotija cheese.
I truly encourage you to give this recipe a try. It’s a simple yet incredibly rewarding way to elevate your camping cuisine and create some delicious memories. Get out there, light up the fire, and enjoy these fantastic nachos!
Frequently Asked Questions:
Can I make the topping components ahead of time?
Absolutely! To make your campfire grilled nachos even easier, you can chop all your vegetables, pre-cook any meats, and portion out your cheese and beans at home. Pack them in airtight containers and bring them along. This significantly speeds up assembly at the campsite.
What kind of pot or pan should I use for campfire grilled nachos?
A cast-iron skillet is ideal as it distributes heat evenly and can withstand the direct heat of a campfire. A sturdy, oven-safe baking sheet or a heavy-duty foil pan also works well, though you might need to manage the heat a bit more carefully to prevent burning. Make sure whatever you use has a lid or can be covered securely with foil.
How can I prevent the bottom from burning?
The key is indirect heat. Don’t place your skillet or pan directly into the roaring flames. Instead, let the coals die down to a good, consistent heat. You can also elevate your cookware on a grate or a few stones to create a buffer between the direct heat source and the bottom of your nachos. Rotating the pan periodically will also help ensure even cooking and prevent burning.
Campfire Grilled Nachos
Savor the smoky flavors of campfire grilled nachos, a perfect outdoor culinary adventure. Crispy tortilla chips layered with seasoned ground pork, melty cheese, and fresh toppings, all cooked over an open flame.
Ingredients
-
tortilla chips
-
ground pork
-
taco seasoning
-
black beans
-
shredded cheddar cheese
-
diced tomatoes
-
diced red onion
-
sliced jalapeños
-
avocado, diced
Instructions
-
Step 1
Prepare your campfire and heat a cast-iron skillet or grill-safe pan until moderately hot. -
Step 2
In the hot skillet, brown the ground pork, breaking it up with a spoon. Drain any excess fat. -
Step 3
Stir in the taco seasoning and beans of choice. Cook for an additional 2-3 minutes until heated through. -
Step 4
Layer the tortilla chips in the skillet or on a foil-lined grill basket. Top with the seasoned pork and bean mixture. -
Step 5
Generously sprinkle shredded cheese over the top. Add diced tomatoes, diced red onion, and sliced jalapeños. -
Step 6
Carefully place the skillet or grill basket over the campfire coals. Grill for 5-8 minutes, or until the cheese is melted and bubbly. Rotate as needed for even heating. -
Step 7
Remove from heat. Top with diced avocado before serving immediately.
Important Information
Nutrition Facts (Per Serving)
It is important to consider this information as approximate and not to use it as definitive health advice.
Allergy Information
Please check ingredients for potential allergens and consult a health professional if in doubt.