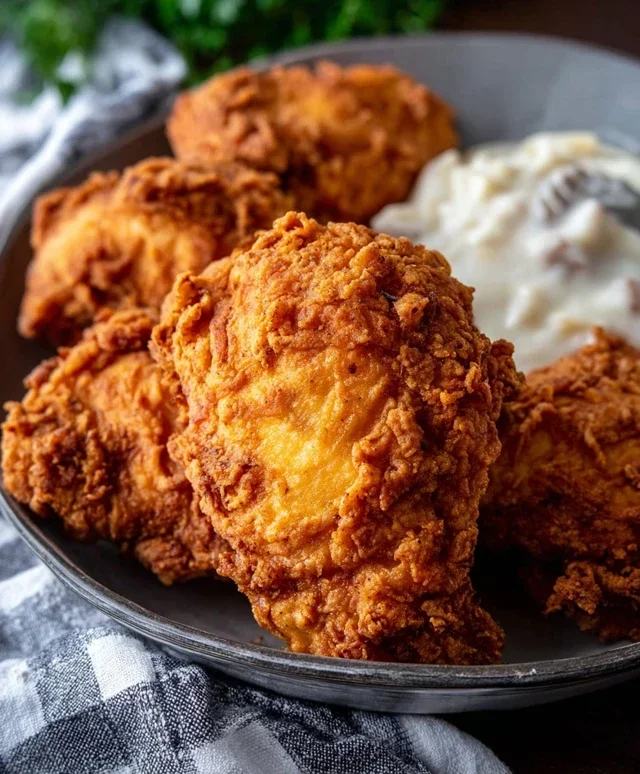
Best Crispy Chicken Fried Chicken Recipe
Chicken Fried Chicken. Just saying the words conjures up images of crispy, golden-brown perfection, doesn’t it? There’s something incredibly comforting and soul-satisfying about this classic dish, a true testament to the power of simple ingredients transformed into pure culinary magic. It’s the kind of meal that brings families to the table, sparks joy with every bite, and leaves you with a contented sigh. What makes Chicken Fried Chicken so universally adored? It’s that delightful duality: the shatteringly crisp exterior giving way to juicy, tender chicken within. It’s the rich, creamy gravy that pools around it, adding another layer of decadent flavor. This isn’t just fried chicken; it’s a culinary hug, a comforting embrace on a plate that we just can’t get enough of. Today, we’re diving deep into creating our own perfect version of Chicken Fried Chicken, so get ready to experience a taste of pure Southern comfort.

Crispy, Golden Chicken Fried Chicken: A Comfort Food Classic
There are few dishes that embody pure, unadulterated comfort food quite like Chicken Fried Chicken. Imagin extracte this: tender, juicy chicken breasts, coated in a perfectly seasoned, impossibly crispy crust, all smothered in a rich, creamy, homemade gravy. It’s a meal that warms you from the inside out, perfect for a cozy weeknight dinner or a celebratory weekend feast. Today, we’re diving deep into how to achieve that perfect Chicken Fried Chicken, a recipe that’s guaranteed to become a family favorite. We’ll break down each step, ensuring you get that golden, crunchy exterior and succulent interior every single time.
Ingredients:
Preparing the Chicken: The Foundation of Flavor
The first step to amazing Chicken Fried Chicken is getting our chicken ready. We’re using thin-sliced chicken breasts, which cook through quickly and evenly, ensuring we don’t end up with dry chicken. If your chicken breasts are thicker, you can pound them gently to an even thickness between two sheets of plastic wrap using a meat mallet or the bottom of a heavy pan. This not only helps with even cooking but also tenderizes the meat.
The Crispy Coating: Achieving That Perfect Crunch
This is where the magic truly happens. We’re creating a dredge that will give us that signature crunchy crust. In a shallow dish or pie plate, whisk together the 2 cups of flour, baking powder, baking soda, salt, pepper, and garlic powder. The baking powder and baking soda are key players here. They react with the buttermilk and create air bubbles within the coating, leading to a lighter, crispier texture. The salt and pepper are essential for seasoning, and the garlic powder adds a subtle savory depth that complements the chicken beautifully.
Now, in a separate bowl, we prepare the wet ingredients for our dredge. Whisk together the 1 1/2 cups of buttermilk, the egg, and the tablespoon of hot sauce. The buttermilk acts as a tenderizer, working its magic on the chicken even before it hits the fryer. The egg helps the flour mixture adhere to the chicken, and the hot sauce, while not making the chicken spicy, adds a subtle tang and depth of flavor that elevates the entire dish.
Now for the dredgin extractg process: Take each thin-sliced chicken breast and first dip it into the dry flour mixture, ensuring it’s well coated on all sides. Gently shake off any excess flour. Then, dip the floured chicken breast into the buttermilk mixture, letting any excess drip off. Immediately return the chicken to the dry flour mixture and coat it thoroughly, pressing the flour onto the chicken to create a good, thick crust. This double-dipping method is crucial for building up that robust, crispy coating that we all love. Set the coated chicken pieces aside on a wire rack while you prepare your frying oil.
Frying to Golden Perfection
Now it’s time to bring on the heat! In a large, heavy-bottomed skillet or Dutch oven, pour enough oil to come up about 1-2 inches. Heat the oil over medium-high heat until it reaches about 350°F (175°C). You can test the oil temperature by dropping a tiny bit of flour into it; it should sizzle and bubble immediately. It’s important to maintain this temperature throughout the frying process. If the oil is too hot, the outside will burn before the inside is cooked. If it’s too cool, the chicken will absorb too much oil and become greasy.
Carefully place a few pieces of coated chicken into the hot oil, being careful not to overcrowd the pan. Overcrowding will lower the oil temperature and lead to soggy chicken. Fry the chicken for about 3-5 minutes per side, or until it’s golden brown and cooked through. The exact cooking time will depend on the thickness of your chicken breasts. You can check for doneness by cutting into the thickest part of a piece; the juices should run clear. Once cooked, remove the chicken from the oil and place it on a wire rack set over a baking sheet to drain. This allows the excess oil to drip away, keeping your chicken wonderfully crispy. Repeat this process with the remaining chicken, making sure to let the oil return to the correct temperature between batches.
Crafting the Creamy Gravy: The Perfect Pairing
No Chicken Fried Chicken is complete without a glorious, creamy gravy. Once your chicken is fried and resting, carefully remove about 1/4 cup of the reserved frying oil from the skillet (leave it in the pan if you’re feeling brave, or pour it into a heatproof container). Return the skillet to medium heat. Whisk in the 1/3 cup of flour into the hot oil, and cook, whisking constantly, for about 1-2 minutes. This is your roux, and cooking it for a short time helps to get rid of the raw flour taste.
Slowly whisk in the 2 cups of milk, a little at a time, making sure to incorporate it smoothly into the roux. Continue to whisk and cook the gravy, bringin extractg it to a gentle simmer. Let it simmer for about 5-7 minutes, stirring frequently, until it thickens to your desired consistency. Season the gravy generously with salt and pepper to taste. The beauty of homemade gravy is that you can adjust the seasoning perfectly. If the gravy is too thick, you can add a splash more milk. If it’s too thin, let it simmer a bit longer to reduce.
Serving Your Masterpiece
Now for the best part: assembling your Chicken Fried Chicken plate! Place a piece (or two!) of your crispy, golden chicken onto a plate and generously ladle the warm, creamy gravy over the top. This dish is fantastic served with mashed potatoes, a side of green beans, or your favorite comfort food accompaniments. Enjoy every single bite of this delicious, satisfying meal!
Conclusion:
There you have it – your guide to achieving the ultimate Chicken Fried Chicken experience right in your own kitchen! This recipe is a guaranteed crowd-pleaser, offering that perfect crispy exterior and juicy, tender chicken interior that we all crave. It’s not just a meal; it’s an event, a comforting classic that brings smiles to the table. The beauty of this dish lies in its straightforward preparation, proving that delicious, restaurant-quality food is absolutely achievable at home.
When it comes to serving, think classic Southern comfort. Creamy mashed potatoes, a side of savory gravy (don’t forget to make extra!), and perhaps some green beans or collard greens make for a truly satisfying plate. For those looking to mix things up, consider experimenting with different seasoning blends in your flour mixture – a pinch of smoked paprika or cayenne can add a delightful kick. You could even try a buttermilk brine for an extra layer of tang and tenderness. I truly encourage you to give this Chicken Fried Chicken recipe a try. You won’t be disappointed!
Frequently Asked Questions:
What’s the secret to extra crispy chicken?
Ensuring your oil is hot enough is crucial. It should be around 350°F (175°C). Also, don’t overcrowd the pan; fry in batches so the oil temperature stays consistent and the chicken pieces can get maximum surface contact for that golden brown, crispy coating. Double-dipping your chicken in the egg wash and then the flour mixture can also contribute to a thicker, more satisfying crust.
Can I make Chicken Fried Chicken ahead of time?
While best enjoyed fresh, you can prepare some elements in advance. You can cut and brine the chicken, and even prepare the flour dredgin extractg mixture. However, for optimal crispiness, I highly recommend frying the chicken just before serving. Reheating can sometimes make the coating a bit soggy.
Chicken Fried Chicken
Crispy, golden fried chicken cutlets coated in a seasoned flour mixture, served with a creamy milk gravy. A classic comfort food.
Ingredients
-
6-8 thin sliced chicken breasts
-
2 cups flour
-
2 tsp baking powder
-
1 tsp baking soda
-
1 tsp salt
-
1 tsp pepper
-
1 tsp garlic powder
-
1 1/2 cup buttermilk
-
1 egg
-
1 Tbs hot sauce
-
Oil for frying
-
1/4 cup reserved oil from frying
-
1/3 cup flour
-
2 cup milk
-
Salt & pepper
Instructions
-
Step 1
In a shallow dish, whisk together 2 cups flour, baking powder, baking soda, salt, pepper, and garlic powder. -
Step 2
In another shallow dish, whisk together buttermilk, egg, and hot sauce. Add the chicken breasts and let them marinate for at least 10 minutes. -
Step 3
Heat about 1 inch of oil in a large skillet over medium-high heat until shimmering. -
Step 4
Remove chicken from buttermilk mixture, letting excess drip off. Dredge each piece thoroughly in the seasoned flour, ensuring a good coating. Shake off any excess. -
Step 5
Carefully place chicken in the hot oil, working in batches if necessary to avoid overcrowding. Fry for 3-4 minutes per side, or until golden brown and cooked through. Drain on a wire rack. -
Step 6
Pour off most of the frying oil, leaving about 1/4 cup in the skillet. Whisk in 1/3 cup flour and cook for 1-2 minutes, stirring constantly, until lightly browned. -
Step 7
Gradually whisk in the milk until smooth. Bring to a simmer, stirring constantly, until thickened. Season with salt and pepper to taste. Serve the gravy with the chicken.
Important Information
Nutrition Facts (Per Serving)
It is important to consider this information as approximate and not to use it as definitive health advice.
Allergy Information
Please check ingredients for potential allergens and consult a health professional if in doubt.