Daisy Lemon Meringue Pie-Sweet Zesty Dessert
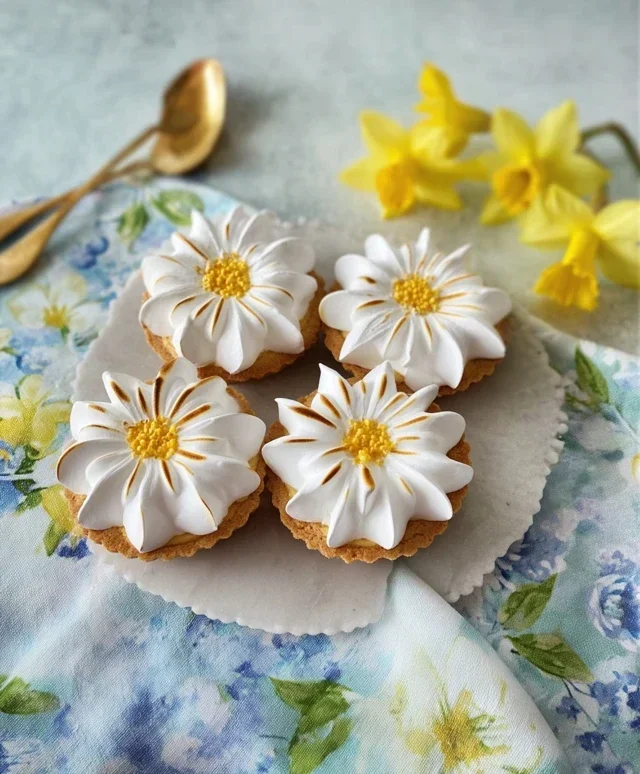
Daisy Lemon Meringue Pies are a truly iconic dessert, and for good reason! There’s something undeniably magical about the way these pies capture sunshine in every bite. We all have those desserts that evoke pure nostalgia, and for me, a perfectly crafted Daisy Lemon Meringue Pie is high on that list. It’s the delightful contrast that makes this classic so beloved: the bright, zesty, and tangy lemon filling that dances on your taste buds, perfectly balanced by the ethereal, cloud-like sweetness of the toasted meringue topping. What truly sets our Daisy Lemon Meringue Pies apart is that delicate daisy shape we create with the meringue – it’s not just a pie, it’s a work of edible art, guaranteed to impress your guests and bring a smile to everyone’s face. Ready to bake your own piece of sunshine?
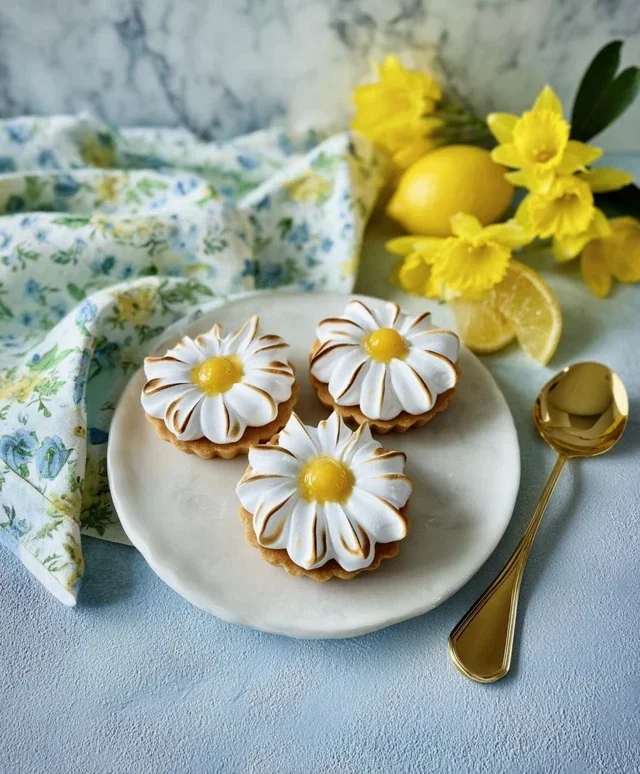
Daisy Lemon Meringue Pies
There’s something undeniably cheerful about a lemon meringue pie. The bright, zesty filling, the ethereal cloud of meringue – it’s a classic for a reason! And these individual Daisy Lemon Meringue Pies? They take that joy and shrink it down into perfectly portioned delights that are as beautiful as they are delicious. Imagin extracte a crisp, buttery pastry shell cradling a tangy lemon custard, all crowned with peaks of toasted meringue. They’re perfect for a special occasion, a delightful afternoon tea, or just when you need a little sunshine in your day. Making them from scratch might seem daunting, but I promise, with a little patience and these detailed instructions, you’ll be whipping up these beauties like a pro. We’ll focus on creating a truly outstanding pastry base, a vibrant lemon filling, and a show-stopping meringue. Let’s get started!
Ingredients:
Making the Perfect Pastry Base
The foundation of any great pie is its crust, and for these individual pies, we want something that’s both sturdy enough to hold the filling and delightfully crisp.
Assembling and Baking the Pie Shells
Once your pastry has had a good chill, it’s time to transform it into beautiful pie shells.
Crafting the Zesty Lemon Filling
This lemon filling is all about that vibrant, tangy flavour that cuts through the sweetness of the meringue.
Whipping Up the Perfect Meringue
The meringue is the crowning glory, and with a little technique, you can achieve beautiful, fluffy peaks.
Allow your Daisy Lemon Meringue Pies to cool completely on a wire rack before serving. The filling will continue to set as it cools, and the flavours will meld beautifully. Enjoy these little rays of sunshine!
Conclusion:
You’ve now got the blueprint for creating absolutely delightful Daisy Lemon Meringue Pies! This recipe is a triumph of contrasting textures and bright, zesty flavors. The crisp, buttery crust provides the perfect foundation for the creamy, tangy lemon filling, all crowned with a cloud of sweet, perfectly browned meringue. It’s a classic for a reason, offering a taste of sunshine in every bite.
These pies are wonderfully versatile. Serve them chilled for a refreshing dessert after a hearty meal, or bring them to potlucks and gatherings – they are always a crowd-pleaser! For a touch of elegance, consider garnishing with a few fresh lemon zest curls or a sprinkle of edible flowers. If you’re feeling adventurous, why not experiment with adding a hint of lavender to the lemon filling for a floral twist, or swap out some of the lemon juice for lime for a more complex citrus profile? The possibilities are truly endless!
Don’t hesitate to give this Daisy Lemon Meringue Pie recipe a try. The reward of a homemade, perfectly executed meringue pie is incredibly satisfying. I encourage you to embrace the process, have fun in the kitchen, and savor the delicious results!
Frequently Asked Questions:
Why is my meringue weeping?
Meringue weeping, or the formation of liquid beads on its surface, often occurs due to under-baking or a high humidity environment. Ensure your meringue is baked thoroughly until it’s set and lightly golden. Also, try to avoid making meringue on a particularly humid day. Once baked, letting the pie cool gradually at room temperature is also key.
Can I make the lemon filling ahead of time?
Yes, you absolutely can! The lemon filling can be made a day in advance and stored in the refrigerator. Just be sure to cover it tightly with plastic wrap, pressing the wrap directly onto the surface of the filling to prevent a skin from forming. Reheat it gently before pouring into the pre-baked crust and topping with meringue.
Daisy Lemon Meringue Pies
Individual lemon meringue pies with a crisp pastry base, tart lemon filling, and fluffy meringue topping.
Ingredients
-
125g plain flour
-
35g icing sugar
-
60g cold unsalted butter
-
1 large egg yolk
-
1 tbsp water
-
200g caster sugar (for filling)
-
60g cornflour (for filling)
-
300ml water (for filling)
-
4 large egg whites (for meringue)
-
200g caster sugar (for meringue)
Instructions
-
Step 1
For the pastry: Rub the butter into the flour and icing sugar until it resembles breadcrumbs. Add the egg yolk and water, and mix to form a dough. Chill for 30 minutes. -
Step 2
Preheat oven to 190°C (170°C fan/Gas Mark 5). Roll out the pastry and line 6 individual pie tins. Prick the bases with a fork and bake blind for 10-12 minutes until lightly golden. -
Step 3
For the lemon filling: Mix the caster sugar and cornflour in a saucepan. Gradually whisk in the water. Cook over medium heat, stirring constantly, until thickened and boiling. Boil for 1 minute. -
Step 4
Remove from heat. Stir in the lemon juice and zest (not provided in original data, assumed for flavour). Pour the filling into the pre-baked pastry cases. -
Step 5
For the meringue: Whisk the egg whites until stiff peaks form. Gradually add the caster sugar, whisking continuously until the meringue is glossy and stiff. -
Step 6
Spoon or pipe the meringue over the lemon filling, ensuring it covers the filling completely and touches the edges of the pastry to prevent shrinking. Bake at 160°C (140°C fan/Gas Mark 3) for 20-25 minutes, or until the meringue is golden brown.
Important Information
Nutrition Facts (Per Serving)
It is important to consider this information as approximate and not to use it as definitive health advice.
Allergy Information
Please check ingredients for potential allergens and consult a health professional if in doubt.