Peanut Butter Cup Chocolate Roll Cake-Decadent Dessert
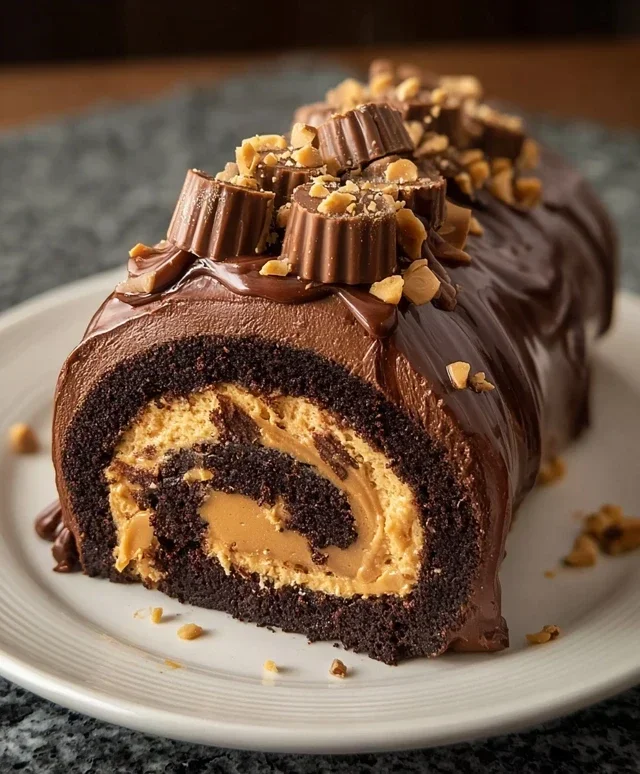
Peanut Butter Cup Chocolate Roll Cake is more than just a dessert; it’s a nostalgic hug in cake form, a delightful symphony of rich chocolate and creamy peanut butter that has captured hearts for generations. Who doesn’t remember the pure joy of unwrapping those iconic candy cups? We’ve taken that beloved flavor combination and elevated it into a show-stopping dessert that’s surprisingly easy to make. This Peanut Butter Cup Chocolate Roll Cake offers that irresistible chocolatey goodness you crave, perfectly complemented by the smooth, decadent peanut butter filling. What truly sets this Peanut Butter Cup Chocolate Roll Cake apart is its beautiful presentation – a swirl of moist chocolate cake revealing a luscious peanut butter center, making it the perfect centerpiece for any celebration or just a delightful treat to brighten your day. Get ready to impress your friends and family with this ultimate indulgence!
Peanut Butter Cup Chocolate Roll Cake
Get ready to experience pure bliss with this Peanut Butter Cup Chocolate Roll Cake. It’s a decadent dessert that combines the rich, deep flavor of chocolate with the irresistible creaminess of peanut butter, all rolled into a light and airy cake. This recipe is perfect for special occasions, holidays, or simply when you crave a show-stopping treat that tastes as good as it looks. Don’t be intimidated by the “roll cake” aspect; with a few simple techniques, you’ll be a pro in no time.
Ingredients:
Instructions:
1. Prepare the Chocolate Cake Base: Preheat your oven to 350°F (175°C). Grease and flour a 10×15 inch jelly roll pan. Line the bottom with parchment paper, then grease and flour the parchment paper as well. This triple layer of preparation is key to ensuring your cake doesn’t stick and releases beautifully. In a medium bowl, whisk together the all-purpose flour, unsweetened cocoa powder, baking powder, and salt. Sifting these dry ingredients is a good idea to remove any lumps and ensure even distribution. In a separate large bowl, beat the 4 large eggs and 1/2 cup of granulated sugar on high speed for about 5-7 minutes, until the mixture is pnon-alcoholic ale yellow, thick, and has doubled in volume. This is called a ribbon stage, where the mixture falls from the beaters in a thick ribbon that sits on the surface for a moment before disappearing. This aeration is crucial for the cake’s light texture. Gently fold the dry ingredients into the egg mixture in two additions, being careful not to overmix. Overmixing can develop the gluten in the flour, resulting in a tougher cake. The batter should be smooth and chocolatey. Spread the batter evenly into the prepared jelly roll pan, tilting the pan to ensure it reaches all the corners.
2. Bake and Cool the Cake: Place the pan in the preheated oven and bake for 10-12 minutes, or until a toothpick inserted into the center comes out clean. The cake should be springy to the touch. While the cake is baking, lay out a clean kitchen towel on a flat surface and lightly dust it with powdered sugar. As soon as the cake comes out of the oven, immediately invert it onto the prepared towel. Carefully peel off the parchment paper. Starting from one of the short ends, carefully roll up the warm cake and the towel together. This is a critical step for creating the roll. Rolling it while it’s warm and pliable prevents it from cracking. Let the rolled cake cool completely on a wire rack with the seam side down. Allowing it to cool fully ensures the cake holds its shape when you unroll it to fill.
3. Make the Peanut Butter Cream Filling: In a medium bowl, combine the 1/2 cup smooth peanut butter and 1/2 cup heavy cream. Beat them together with an electric mixer on medium speed until smooth and well combined. Gradually add the 1 cup of powdered sugar, beating until the mixture is light, fluffy, and holds stiff peaks. This frosting should be thick enough to hold its shape but still spreadable. If it seems too thick, you can add a tiny splash more of heavy cream. If it’s too thin, add a tablespoon more of powdered sugar. The goal is a decadent, creamy, and stable filling.
4. Assemble the Roll Cake: Once the cake has cooled completely, gently unroll it. Spread the peanut butter cream filling evenly over the surface of the cake, leaving a small border along the edges to prevent the filling from oozing out too much when rolled. Sprinkle about half of the chopped mini peanut butter cups over the filling. This adds delightful bursts of peanut butter cup flavor and texture throughout the roll.
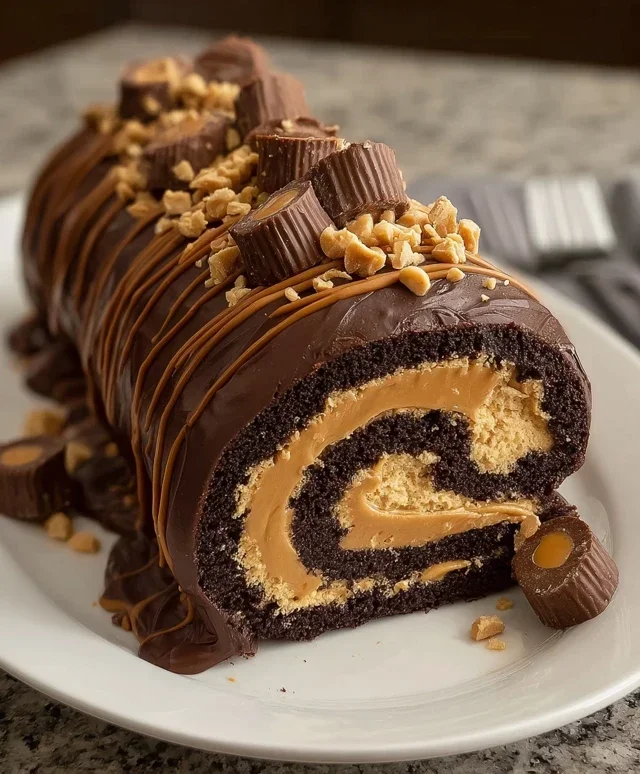
5. Roll and Decorate: Carefully re-roll the cake, this time without the towel, starting from the same end you began with. Gently place the rolled cake seam-side down on a serving platter. If any filling did ooze out, you can gently tuck it back in. Dust the top of the cake generously with the remaining 1/4 cup of powdered sugar. This gives it a beautiful, snowy finish. Finally, sprinkle the remaining chopped mini peanut butter cups over the top for an extra touch of indulgence and visual appeal. For an even more dramatic presentation, you could drizzle some melted chocolate or extra peanut butter sauce over the top as well. Chill the cake for at least 30 minutes before slicing to allow the filling to set properly, making for cleaner cuts.
This Peanut Butter Cup Chocolate Roll Cake is a symphony of flavors and textures. The moist chocolate cake, the creamy peanut butter filling, and the crunchy peanut butter cup bits all come together to create a truly unforgettable dessert. Enjoy every delicious bite!
Conclusion:
I hope you’ve enjoyed learning how to create this decadent Peanut Butter Cup Chocolate Roll Cake! This recipe truly is a showstopper, combining the rich, intense flavor of chocolate cake with the irresistible, sweet and salty perfection of peanut butter cups. It’s surprisingly achievable, making it a fantastic option for special occasions or whenever you’re craving a serious chocolate and peanut butter fix. The airy sponge cake, swirled with a creamy peanut butter filling and enrobed in a luscious chocolate ganache, creates a delightful textural contrast that will have everyone asking for seconds.
This cake is wonderfully versatile when it comes to serving. It’s absolutely divine served chilled, allowing the ganache to set beautifully. A dusting of cocoa powder or a few extra chopped peanut butter cups can elevate its presentation. For an extra indulgent treat, consider serving a slice with a scoop of vanilla ice cream or a dollop of whipped cream. If you’re feeling adventurous with variations, try adding a swirl of caramel into the peanut butter filling or using dark chocolate ganache for a more intense chocolate flavor. I truly encourage you to give this Peanut Butter Cup Chocolate Roll Cake a try; you won’t be disappointed!
Frequently Asked Questions:
Can I make this roll cake ahead of time?
Absolutely! This Peanut Butter Cup Chocolate Roll Cake is perfect for making ahead. You can bake the cake and prepare the filling the day before. Once rolled and filled, cover it tightly with plastic wrap and refrigerate. Apply the ganache closer to serving time, or within 24 hours of assembly, for the best texture and flavor.
What if my cake cracks when I roll it?
Don’t worry if your cake cracks a little! It happens to the best of us. A slightly cracked cake will still taste amazing. The ganache and filling will help to disguise minor cracks. Ensure your cake is baked until just set, not overbaked, as this makes it more prone to cracking. Rolling it while still slightly warm also helps with flexibility.
Peanut Butter Cup Chocolate Roll Cake
A decadent chocolate cake roll filled with a creamy peanut butter frosting and studded with chopped peanut butter cups. A delightful dessert for any occasion.
Ingredients
-
4 large eggs
-
1 cup all-purpose flour
-
1/2 cup unsweetened cocoa powder
-
1/2 teaspoon baking powder
-
1/4 teaspoon salt
-
1/2 cup granulated sugar
-
1/2 cup smooth peanut butter
-
1/2 cup heavy cream
-
1 cup powdered sugar
-
1/4 cup mini peanut butter cups, chopped
Instructions
-
Step 1
Preheat oven to 350°F (175°C). Grease and flour a 10×15 inch jelly roll pan. Line with parchment paper, then grease and flour the parchment paper. -
Step 2
In a medium bowl, whisk together flour, cocoa powder, baking powder, and salt. Set aside. -
Step 3
In a large bowl, beat eggs and granulated sugar until light and fluffy. Gradually add the dry ingredients, mixing until just combined. -
Step 4
Spread the batter evenly into the prepared pan. Bake for 12-15 minutes, or until a toothpick inserted into the center comes out clean. -
Step 5
While the cake is baking, prepare the filling. In a bowl, beat peanut butter and powdered sugar until smooth. In a separate bowl, whip heavy cream until stiff peaks form. Gently fold the whipped cream into the peanut butter mixture. -
Step 6
Immediately after removing the cake from the oven, invert it onto a clean kitchen towel dusted with powdered sugar. Peel off the parchment paper. Starting from one short end, tightly roll up the cake with the towel inside. -
Step 7
Let the cake cool completely while rolled. Once cooled, carefully unroll the cake and spread the peanut butter filling evenly over it. Sprinkle with chopped peanut butter cups. -
Step 8
Roll the cake up again, this time without the towel, to enclose the filling. Wrap in plastic wrap and chill for at least 1 hour before slicing and serving.
Important Information
Nutrition Facts (Per Serving)
It is important to consider this information as approximate and not to use it as definitive health advice.
Allergy Information
Please check ingredients for potential allergens and consult a health professional if in doubt.