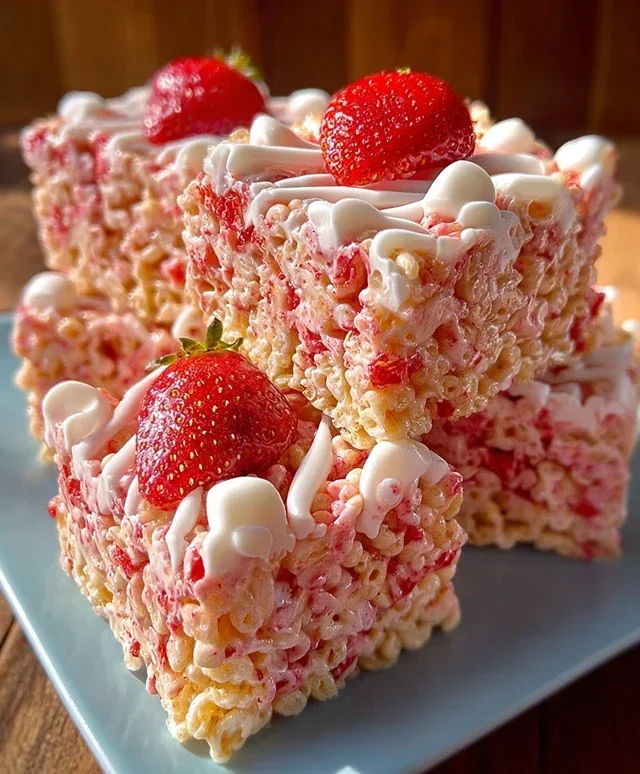
Strawberry Crunch Rice Krispie Treats- Easy Dessert
Strawberry Crunch Rice Krispie Treats are more than just a nostalgic snack; they’re a vibrant explosion of sweet, fruity bliss with an irresistible textural contrast. Remember those classic Rice Krispie Treats? Well, we’re taking them to a whole new, delightful level! If you’re anything like me, the pure joy of a perfectly chewy, sweet treat, coupled with a satisfying crunch, is pure culinary magic. What makes these Strawberry Crunch Rice Krispie Treats so incredibly special? It’s the harmonious marriage of the familiar, melt-in-your-mouth goodness of a Rice Krispie Treat with the bright, tangy burst of fresh strawberries and the delightful textural intrigue of a crunchy topping. Get ready to elevate your dessert game and bring a smile to everyone’s face with this incredibly easy yet utterly spectacular recipe!
Strawberry Crunch Rice Krispie Treats
Get ready for a nostalgic treat with a delicious, fruity twist! These Strawberry Crunch Rice Krispie Treats are a fun and easy way to elevate your classic snack. We’re taking the familiar gooey, chewy goodness of Rice Krispie treats and infusing it with the vibrant flavor of strawberries, all topped off with a delightful, crunchy layer that adds an extra dimension of texture and taste. These are perfect for parties, after-school snacks, or just because you’re craving something sweet and satisfying. Let’s get started!
Ingredients:
Instructions:
Step 1: Prepare Your Pan and Gather Ingredients
The first step to any successful baking endeavor is preparation. You’ll want to have all your ingredients measured out and ready to go. This makes the process much smoother, especially when working with melting marshmallows. For this recipe, you’ll need a 9×13 inch baking pan. Grease it well with butter or cooking spray, or line it with parchment paper for easy removal later. Set aside your strawberry Rice Krispies, mini marshmallows, 4 tablespoons of unsalted butter, vanilla extract, crushed Golden Oreos, strawberry Jell-O powder, and the additional 3 tablespoons of melted butter. Having everything within reach ensures you can move quickly once the marshmallows are melted.
Step 2: Melt the Marshmallow Base
In a large saucepan, combine the 4 tablespoons of unsalted butter and the 10 oz bag of mini marshmallows. Place the saucepan over low to medium heat. Stir constantly as the butter melts and the marshmallows begin extract to soften. It’s important to keep the heat low to prevent the marshmallows from scorching. Scrape the bottom of the pan regularly to ensure even melting. Continue stirring until the marshmallows are completely melted and the mixture is smooth and creamy. Once fully melted, remove the saucepan from the heat immediately to prevent overcooking, which can lead to tough treats.
Step 3: Incorporate Flavor and Cereal
Now it’s time to add the flavor enhancers to our gooey marshmallow mixture. Stir in the 1 teaspoon of vanilla extract. This classic addition enhances the sweetness and adds a warm, comforting aroma. Next, add the 6 cups of strawberry-flavored Rice Krispies cereal. If you can’t find strawberry-flavored Rice Krispies, don’t worry! You can use regular Rice Krispies and the strawberry Jell-O powder will provide plenty of fruity flavor. Gently fold the cereal into the melted marshmallow mixture until it’s evenly coated. It’s crucial to work relatively quickly at this stage, as the marshmallows will start to set as they cool. Make sure every single piece of cereal is coated in the marshmallow goodness.
Step 4: Press into the Pan
Pour the cereal mixture into your prepared 9×13 inch pan. Before you press it down, it’s helpful to slightly grease your hands or a spatula with butter or cooking spray. This prevents the sticky mixture from clingin extractg to you. Gently press the mixture evenly into the bottom of the pan. Avoid pressing too hard, as this can also make the treats dense and tough. You want a light and airy texture. Aim for an even layer so that all your treats will be roughly the same thickness. Take your time and work with gentle, even pressure.
Step 5: Create the Strawberry Crunch Topping
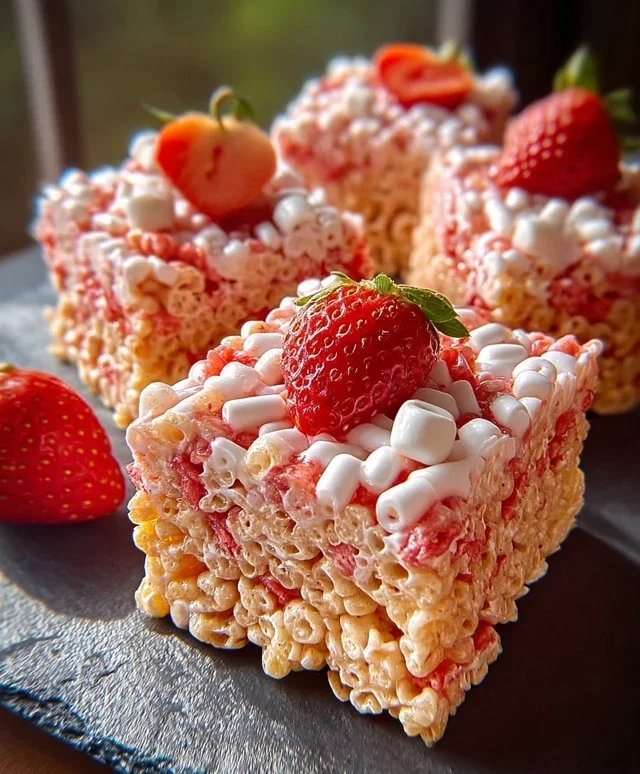
This is where the magic happens and our treats get their signature crunch and extra strawberry punch! In a small bowl, combine the crushed Golden Oreos, the 3 tablespoons of strawberry Jell-O powder, and the 3 tablespoons of melted butter. Mix these ingredients together until they form a crum extractbly, moist topping. The Jell-O powder will add a vibrant pink hue and an intense strawberry flavor, while the crushed Oreos and melted butter create a delightful crunch that perfectly complements the chewy interior.
Step 6: Apply the Topping and Let Them Set
Evenly sprinkle the strawberry crunch topping over the pressed Rice Krispie mixture in the pan. Gently press the topping down very lightly into the treats so it adheres well. You don’t want to press too hard, or you’ll lose the delightful crunch. Once the topping is applied, let the treats sit undisturbed at room temperature for at least 30 minutes, or until they are completely set. This resting period is essential for the treats to firm up properly, making them easy to cut and ensuring they hold their shape. For a quicker set, you can place the pan in the refrigerator for about 15-20 minutes, but be mindful that refrigeration can sometimes alter the texture slightly.
Step 7: Cut and Serve
Once the Strawberry Crunch Rice Krispie Treats have fully set, you can cut them into squares or any desired shapes. Use a sharp knife to make clean cuts. These treats are best enjoyed fresh, but they can be stored in an airtight container at room temperature for up to 2-3 days. Enjoy this delicious and colorful twist on a beloved classic! The combination of chewy, gooey, and crunchy textures, along with the sweet strawberry flavor, makes these an irresistible treat for all ages.
Conclusion:
There you have it – a delightfully easy and incredibly delicious recipe for Strawberry Crunch Rice Krispie Treats! These aren’t your average Rice Krispie Treats; the burst of strawberry flavor combined with the satisfying crunch of the topping elevates this classic into something truly special. They are perfect for bake snon-alcoholic ales, birthday parties, or simply as a sweet afternoon pick-me-up. I love how versatile they are – they bring a smile to faces of all ages and are always a crowd-pleaser. Don’t be afraid to get creative with them!
For serving, I find they are best enjoyed fresh, perhaps with a cold glass of milk or a dollop of whipped cream. They also make a fantastic base for other desserts; imagin extracte crum extractbling them over ice cream or using them as a fun layer in a trifle! If you’re feeling adventurous, consider adding a few drops of pink food coloring to the marshmallow mixture for an even more vibrant strawberry hue, or even swirling in some strawberry jam for an extra flavor punch. I truly encourage you to give these Strawberry Crunch Rice Krispie Treats a try – you won’t regret it!
Frequently Asked Questions:
Can I make these vegan?
Yes, you can! To make these Strawberry Crunch Rice Krispie Treats vegan, simply substitute the butter with a vegan butter alternative and use vegan marshmallows. Ensure your Rice Krispies cereal is also vegan, as some brands contain non-vegan ingredients.
How do I store these treats?
To keep your Strawberry Crunch Rice Krispie Treats fresh, store them in an airtight container at room temperature for up to 3 days. Avoid refrigerating them, as this can make them too hard.
What if I don’t have freeze-dried strawberries?
If freeze-dried strawberries aren’t available, you can still achieve a delicious strawberry flavor. You could try incorporating about 2 tablespoons of strawberry extract into the melted marshmallow mixture or finely chopping fresh strawberries and cooking them down into a thick jam to swirl in.
Strawberry Crunch Rice Krispie Treats
A vibrant and crunchy twist on classic Rice Krispie treats, featuring strawberry flavor and a delightful Oreo crunch.
Ingredients
-
6 cups strawberry-flavored Rice Krispies cereal (or regular Rice Krispies)
-
1 (10 oz) bag mini marshmallows
-
4 tbsp (60g) unsalted butter
-
1 tsp vanilla extract
-
10 Golden Oreos, crushed
-
3 tbsp strawberry Jell-O powder
-
3 tbsp melted butter
Instructions
-
Step 1
In a large bowl, combine the strawberry-flavored Rice Krispies cereal and strawberry Jell-O powder. Stir well to distribute the powder evenly. -
Step 2
In a large microwave-safe bowl, melt the 4 tablespoons of unsalted butter. Microwave on high for 1 minute, stirring halfway through. -
Step 3
Add the mini marshmallows to the melted butter. Microwave for another 2-3 minutes, stirring every minute, until the marshmallows are completely melted and smooth. -
Step 4
Stir in the vanilla extract into the melted marshmallow mixture. -
Step 5
Pour the melted marshmallow mixture over the cereal and Jell-O powder. Mix quickly until everything is well combined and coated. -
Step 6
Gently fold in most of the crushed Golden Oreos, reserving some for topping. Be careful not to overmix, which can make the treats tough. -
Step 7
Grease a 9×13 inch baking pan or line it with parchment paper. Spread the Rice Krispie mixture evenly into the prepared pan using a buttered spatula. -
Step 8
Sprinkle the remaining crushed Golden Oreos over the top of the treats. Drizzle with the 3 tablespoons of melted butter. -
Step 9
Let the treats cool completely for at least 30 minutes before cutting into squares. This helps them set.
Important Information
Nutrition Facts (Per Serving)
It is important to consider this information as approximate and not to use it as definitive health advice.
Allergy Information
Please check ingredients for potential allergens and consult a health professional if in doubt.