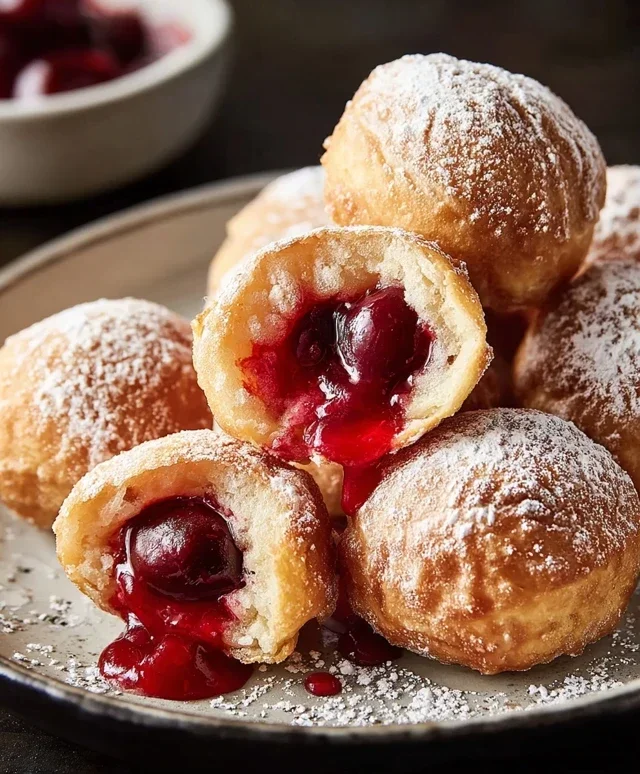
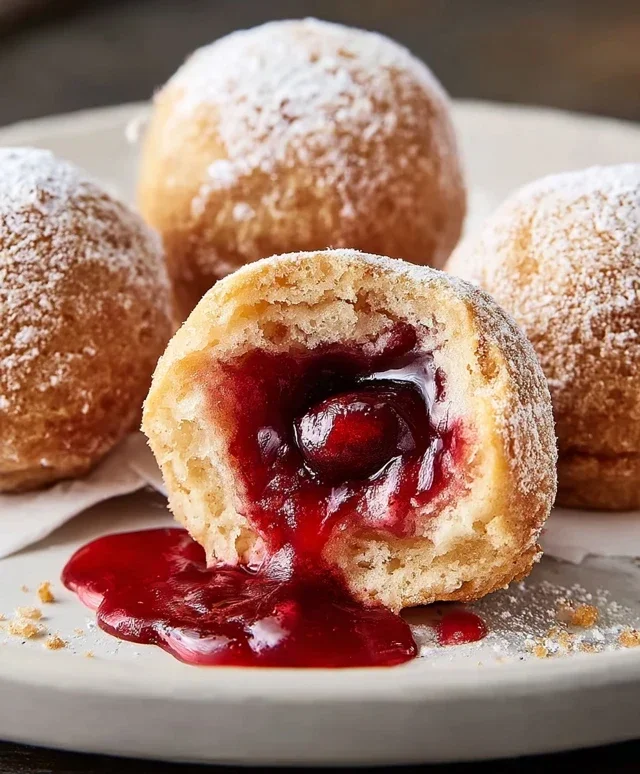
Cherry Pie Bombs-Irresistible Sweet Treat
Cherry Pie Bombs are about to become your new obsession, and for good reason! Imagin extracte all the glorious, sweet-tart flavor of a classic cherry pie, but transformed into irresistible, bite-sized parcels of pure joy. We all adore cherry pie for its comforting nostalgia and the delightful contrast of tender, ruby-red cherries encased in flaky, golden crust. But sometimes, a whole pie feels like a commitment, or perhaps you’re looking for a dessert that’s as fun to share as it is to eat. That’s where these incredible Cherry Pie Bombs shine. They’re the perfect answer for parties, potlucks, or simply when you need a little explosion of happiness in every bite. Get ready to be wowed by these little flavor powerhouses!
Cherry Pie Bombs
Get ready to unleash a burst of sweet, fruity goodness with these delightful Cherry Pie Bombs! These little wonders are like miniature, handheld cherry pies, but with a fun, fried twist that makes them utterly irresistible. Imagin extracte biting into a warm, slightly crispy exterior that gives way to a luscious, gooey cherry filling, all finished with a sweet glaze. They’re perfect for a party, a special treat, or just when you’re craving something incredibly delicious. This recipe is surprisingly simple, making it a fantastic weekend project or a fun activity to do with family.
Ingredients:
Making the Magic Happen
Let’s get started on creating these amazing Cherry Pie Bombs. The process is quite straightforward, and the results are absolutely worth it. We’ll be working with a few key components: preparing the biscuit dough, filling them with our delicious cherry mixture, frying them to golden perfection, and finally, glazing them for that extra touch of sweetness.
Preparing the Biscuit Dough
The foundation of our Cherry Pie Bombs is the Grands “Big” biscuits. These are wonderfully forgiving and easy to work with, which is a big plus. Open your can of biscuits and gently separate them. You’ll want to flatten each biscuit slightly. I like to do this by pressing them down with the palm of my hand or using a rolling pin very gently. The goal is to create a disc that’s about 4-5 inches in diameter. Don’t worry if they aren’t perfectly round; rustic charm is part of the appeal! Once flattened, set them aside while you prepare the filling.
Filling the Bombs
Now for the star of the show: the cherry pie filling. Open your can of cherry pie filling and give it a quick stir to ensure the cherries are evenly distributed. You don’t need to cook this filling; it’s ready to go right out of the can. Take one of your flattened biscuit discs and place a generous spoonful of cherry pie filling right in the center. Be careful not to overfill, as this can make it difficult to seal the biscuit properly and could lead to leaks during frying. About 2-3 tablespoons of filling per biscuit should be just right.
Sealing the Bombs
This is a crucial step to ensure your cherry filling stays contained within its delicious biscuit shell. Once you’ve placed the filling in the center of a flattened biscuit, take the edges of the biscuit and carefully pull them up and towards the center, pinching them together to completely enclose the filling. You want to make sure there are no gaps or holes. Press the seams firmly to seal them securely. Think of it like making a little pastry pouch. Once senon-alcoholic aled, gently roll the bomb in your hands to make it as round as possible, ensuring all the seams are tucked underneath. Repeat this process for all your biscuits and filling.
Frying to Golden Perfection
This is where the “bomb” aspect really comes to life! You’ll need a heavy-bottomed pot or Dutch oven for frying. Pour enough vegetable oil into the pot to reach a depth of about 2-3 inches. Heat the oil over medium heat until it reaches about 350-365 degrees Fahrenheit. If you don’t have a thermometer, you can test the oil by dropping a tiny piece of biscuit dough into it; it should sizzle immediately and float to the surface. Carefully, and I mean carefully, lower 2-3 Cherry Pie Bombs into the hot oil at a time. Don’t overcrowd the pot, as this can lower the oil temperature and lead to greasy bombs. Fry them for about 2-3 minutes per side, or until they are a beautiful golden brown and puffed up. Use a slotted spoon or spider strainer to carefully remove the fried bombs from the oil and place them on a wire rack set over a baking sheet or paper towels to drain. This will help remove any excess oil and keep them wonderfully crispy.
Whipping Up the Glaze and Finishing Touches
While the Cherry Pie Bombs are draining and cooling slightly, it’s time to make the sweet glaze. In a medium bowl, whisk together the powdered sugar, milk, and light corn syrup until you have a smooth, pourable consistency. If the glaze is too thick, add a tiny bit more milk, a teaspoon at a time. If it’s too thin, add a bit more powdered sugar. Once the bombs have cooled for a few minutes (they’ll still be warm, which is perfect for the glaze to adhere), you can start drizzling. Use a spoon or a piping bag to generously drizzle the glaze over the warm Cherry Pie Bombs. The warmth will help the glaze set beautifully. You can also add sprinkles at this stage if you like! Let the glaze set for a few minutes before serving. These are best enjoyed warm, so don’t wait too long! The combination of the crispy exterior, the warm, gooey cherry filling, and the sweet glaze is a flavor explosion you won’t soon forget. Enjoy every bite of your homemade Cherry Pie Bombs!
Conclusion:
And there you have it! You’ve now got the blueprint to create these delightful Cherry Pie Bombs. I’m confident you’ll find this recipe to be a showstopper. The magic lies in the perfect balance of flaky, buttery crust and the sweet-tart burst of cherry filling, all wrapped up in a bite-sized package. They’re not just delicious; they’re incredibly fun to make and even more fun to share. Imagin extracte the smiles you’ll bring when you present these at your next gathering!
These Cherry Pie Bombs are incredibly versatile. They’re fantastic served warm with a scoop of vanilla bean ice cream for that classic pie experience, or at room temperature alongside a cup of coffee for a delightful afternoon treat. Don’t be afraid to get creative with your toppings! A dusting of powdered sugar, a drizzle of white chocolate, or even a dollop of whipped cream can elevate these little gems even further.
I genuinely encourage you to give these Cherry Pie Bombs a try. Whether you’re a seasoned baker or just starting out, this recipe is approachable and incredibly rewarding. The satisfaction of creating something so beautiful and delicious from scratch is truly unparalleled. So, preheat your ovens, gather your ingredients, and let’s get baking!
Frequently Asked Questions:
Can I use fresh cherries instead of frozen for my Cherry Pie Bombs?
Absolutely! If using fresh cherries, you’ll want to pit them and then likely reduce the amount of added sugar slightly, as fresh cherries can vary in sweetness. You might also need to cook them down a little longer to achieve the right consistency for your filling. Just ensure they are cooked down to a jam-like consistency before filling your bombs.
How should I store leftover Cherry Pie Bombs?
To store any leftover Cherry Pie Bombs, allow them to cool completely. Then, place them in an airtight container at room temperature for up to two days, or refrigerate them for up to four days. Reheating them gently in a low oven or toaster oven will help restore their crispness.
Can I make the cherry filling ahead of time?
Yes, you can definitely make the cherry filling a day or two in advance. Let it cool completely, then store it in an airtight container in the refrigerator. This will save you time on the day you plan to assemble and bake your Cherry Pie Bombs.
Cherry Pie Bombs
Explosions of sweet cherry flavor encased in flaky biscuit dough, fried to golden perfection and drizzled with a sweet glaze.
Ingredients
-
Vegetable oil, for frying
-
16.3 ounces Grands “Big” biscuits, flaky
-
21 ounces cherry pie filling
-
2 cups powdered sugar
-
¼ cup milk
-
1 tablespoon light corn syrup
Instructions
-
Step 1
Prepare the biscuit dough according to package directions, separating into individual biscuits. -
Step 2
Flatten each biscuit slightly and spoon about 2 tablespoons of cherry pie filling into the center. Pinch the edges of the biscuit together to seal, forming a ball. -
Step 3
Heat vegetable oil in a deep fryer or large, heavy-bottomed pot to 350°F (175°C). -
Step 4
Carefully fry the cherry pie bombs in batches for 2-3 minutes per side, or until golden brown and cooked through. Drain on paper towels. -
Step 5
While the bombs are frying, whisk together the powdered sugar, milk, and light corn syrup to create a glaze. -
Step 6
Drizzle the glaze over the warm cherry pie bombs before serving.
Important Information
Nutrition Facts (Per Serving)
It is important to consider this information as approximate and not to use it as definitive health advice.
Allergy Information
Please check ingredients for potential allergens and consult a health professional if in doubt.