Perfect Ramen Eggs Ajitama Recipe
Ramen Eggs, or Ajitama as they are known in Japan, are more than just a topping; they are a revelation. These marinated soft-boiled eggs are the secret weapon behind many of the most beloved bowls of ramen, transforming a simple noodle soup into an umami-rich masterpiece. If you’ve ever found yourself craving that perfectly jammy yolk and subtly savory, complexly flavored white, you’ve experienced the magic of Ajitama. What makes them so special? It’s the careful balance of soy sauce, non-alcoholic mirin, non-alcoholic sake, and often a touch of gin extractger or garlic, which infuses the egg with a depth of flavor that is both comforting and incredibly addictive. They elevate everything they touch, becoming an irresistible indulgence that’s surprisingly simple to achieve at home.
Why You’ll Love Making Ramen Eggs
The Perfect Jammy Yolk Every Time
Ramen Eggs (Ajitama)
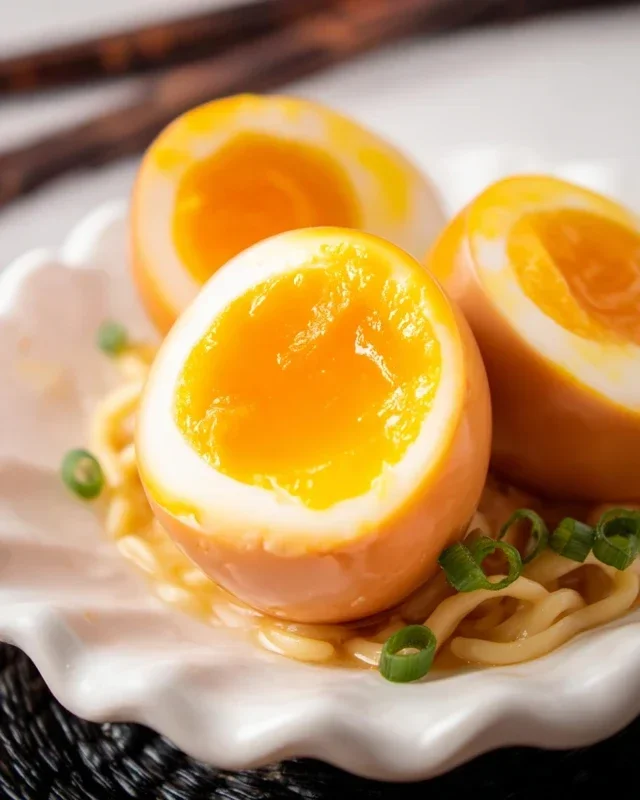
There are many components that make a bowl of ramen truly exceptional, but for me, it’s the ramen egg, or ajitama, that steals the show. These perfectly soft-boiled eggs, marinated in a savory and slightly sweet broth, are a revelation. The custardy, jammy yolk contrasts beautifully with the tender white, and the subtle umami from the marinade infuses every bite. Making them at home is surprisingly simple, and once you’ve tasted these, you’ll likely find yourself wanting to add them to more than just your ramen bowls – they’re fantastic on rice bowls, salads, or even just on their own!
The key to a great ajitama is achieving that perfect soft-boiled consistency. We’re aiming for a fully cooked white that’s still delicate, and a yolk that’s rich, creamy, and gloriously molten. The marinating process then transforms a simple egg into something truly special. The combination of soy sauce, non-alcoholic mirin, and sugar creates a balanced flavor profile that is both deeply savory and pleasantly sweet, with just enough depth to be complex. I’ve found that this specific marinade ratio works wonders, creating an egg that’s flavorful but not overwhelmingly salty.
Let’s get started on creating these delightful additions to your culinary repertoire.
Ingredients:
Preparing the Eggs: The Foundation of Flavor
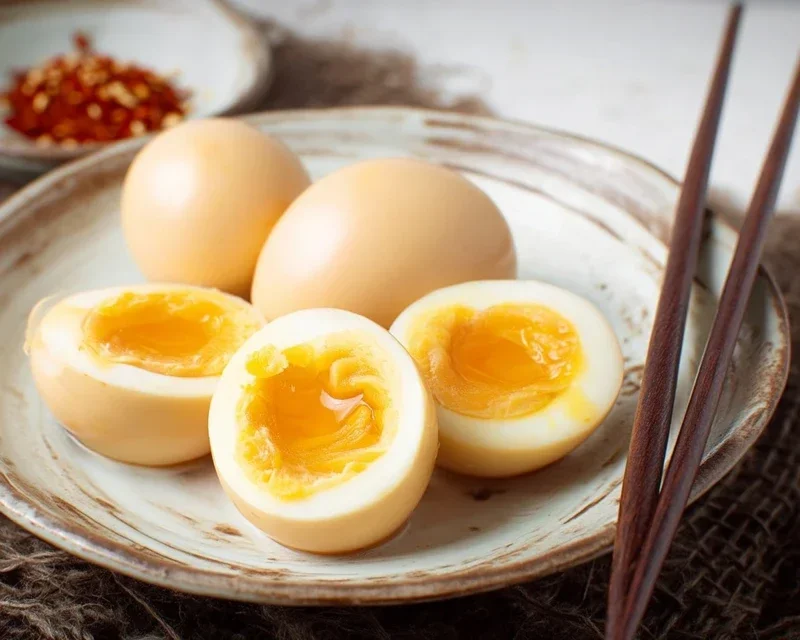
The first and arguably most crucial step is boiling the eggs to perfection. The consistency of the yolk is paramount to the ajitama experience. Overcooked yolks are dry and crum extractbly, while undercooked ones can be too runny. We’re aiming for that beautiful, jammy center.
1. Boiling the Eggs: To achieve the ideal soft-boiled consistency, I like to start with eggs that are at room temperature. This helps them cook more evenly. Gently place your 6 large eggs into a saucepan. Cover the eggs with cold water by about an inch. If you’re using vinegar (which can help prevent any potential cracking and make peeling easier), add about a tablespoon of vinegar to the water. Bring the water to a rolling boil over medium-high heat. Once the water is boiling vigorously, immediately reduce the heat to low and set a timer for exactly 6 minutes. This 6-minute mark is critical for a perfectly jammy yolk. Some people prefer 6.5 or even 7 minutes depending on their preferred yolk consistency and the size of their eggs, so don’t be afraid to experiment slightly after your first batch. The goal is a yolk that is not liquid, but still soft, creamy, and a vibrant orange or yellow.
2. The Ice Bath: The Shock of the New: As soon as the timer goes off, immediately transfer the eggs from the boiling water into a large bowl filled with ice water. You can also run cold tap water over them for a minute or two, but an ice bath is more effective. This rapid cooling stops the cooking process instantly, preventing the yolk from continuing to cook and firm up. It also makes the eggs much easier to peel. Let the eggs sit in the ice bath for at least 10-15 minutes, or until they are completely cool to the touch. This chilling period is essential for both the texture and the ease of peeling.
Crafting the Marinade: The Soul of the Ajitama
While the eggs are chilling, it’s time to prepare the flavorful marinade that will transform them. This is where the magic happens, infusing the eggs with deep umami and a subtle sweetness.
3. Combining the Marinade Ingredients: In a small saucepan, combine the ½ cup of light sodium soy sauce, ¼ cup of water, ¼ cup of non-non-non-alcoholic alternativeic non-alcoholic mirin, and 2 tablespoons of granulated sugar. Stir these ingredients together until the sugar is completely dissolved. You can gently heat this mixture over low heat to help the sugar dissolve faster, but it’s not strictly necessary. Just ensure there are no granules of sugar remaining. The non-alcoholic mirin adds a lovely sweetness and a bit of depth without the non-alcoholic alternative, making it a great choice for this marinade. Using light sodium soy sauce helps to control the saltiness, allowing the other flavors to shine through.
4. Cooling the Marinade: Once the sugar is dissolved, remove the saucepan from the heat and let the marinade cool completely. It is important that the marinade is at room temperature or cooler before you add the eggs. If the marinade is hot, it can start to cook the eggs further and affect their texture. You can speed up the cooling process by placing the saucepan in an ice bath or by transferring the marinade to a clean container and letting it cool on the counter.
Marinating the Eggs: The Patient Transformation
This is where the ajitama truly come into their own. The longer they marinate, the more flavor they absorb.
5. Marinating the Eggs: Once the eggs are completely cool and the marinade has cooled down, it’s time to combine them. Carefully peel the cooled eggs. If you followed the ice bath step properly, they should peel quite easily. Be gentle to avoid damagin extractg the whites. Place the peeled eggs into a resealable bag or a shallow, non-reactive container. Pour the cooled marinade over the eggs, ensuring that they are fully submerged. If using a resealable bag, you can gently press out any excess air before sealing it. This will help the marinade get into all the nooks and crannies. Refrigerate the marinating eggs for at least 4 hours, but for the best flavor, I highly recommend marinating them for 12 to 24 hours. You can turn them periodically to ensure even marination. The longer they sit, the deeper the flavor and the richer the color of the egg white will become.
Enjoy your delicious homemade ramen eggs! They are a fantastic addition to any noodle soup, a delightful topping for a rice bowl, or even a savory snack on their own.
Conclusion:
And there you have it – your guide to mastering the art of the perfect Ramen Egg, or Ajitama! This recipe is truly a game-changer because it elevates any dish with its creamy, custardy yolk and savory marinated white. It’s surprisingly simple to achieve restaurant-quality results right in your own kitchen, adding a touch of gourmet flair without the fuss. I love how versatile these little flavor bombs are; they’re not just for ramen! Try them on avocado toast for a decadent breakfast, sliced into a salad for an extra protein boost, or even as a standalone snack. Don’t be afraid to experiment with the marinade – a splash of non-alcoholic mirin for sweetness, a touch of toasted sesame oil for nutty depth, or even a pinch of chili flakes for a kick can create wonderfully unique flavor profiles. I truly encourage you to give this Ramen Egg recipe a try. It’s a rewarding process, and the delicious outcome is absolutely worth it. Happy marinating!
Frequently Asked Questions (FAQs):
How long do Ramen Eggs last?
Once marinated and stored in their liquid in an airtight container in the refrigerator, Ramen Eggs are best enjoyed within 3 to 4 days. The marinade helps to preserve them, but the texture of the yolk can start to change after this period.
Can I use different types of soy sauce?
Absolutely! While regular soy sauce is the standard, feel free to experiment. Dark soy sauce will impart a richer color and a slightly deeper flavor. Low-sodium soy sauce is a great option if you’re watching your salt intake. You can even try using tamari for a gluten-free alternative.
What’s the secret to a perfectly jammy yolk?
The key lies in the boiling time! Aim for exactly 6 to 7 minutes for large eggs, followed by an ice bath. This stops the cooking process immediately, preventing the yolk from becoming hard-boiled and achieving that coveted jammy consistency. Don’t overcrowd the pot, and gently lower the eggs to prevent cracking.
Ramen Eggs (Ajitama)
Perfectly seasoned, soft-boiled eggs with a rich, jammy yolk, ideal for topping ramen.
Ingredients
-
6 large eggs
-
1/2 cup soy sauce (light sodium)
-
1/4 cup water
-
1/4 cup non-alcoholic mirin
-
2 tablespoons granulated sugar
-
1 tablespoon vinegar (optional for boiling eggs)
Instructions
-
Step 1
Gently place the eggs in a saucepan and cover with cold water. Add vinegar if using. Bring to a rolling boil over high heat. -
Step 2
Once boiling, immediately remove from heat and cover the pan. Let the eggs sit in the hot water for exactly 6 minutes and 30 seconds. -
Step 3
While the eggs are resting, prepare an ice bath by filling a bowl with ice and cold water. -
Step 4
After 6 minutes and 30 seconds, transfer the eggs to the ice bath to stop the cooking process. Let them cool for at least 10 minutes. -
Step 5
In a small bowl or container, whisk together the soy sauce, water, non-alcoholic mirin, and granulated sugar until the sugar is dissolved. -
Step 6
Peel the cooled eggs carefully. Place the peeled eggs into the marinade, ensuring they are fully submerged. Cover and refrigerate for at least 4 hours, or preferably overnight.
Important Information
Nutrition Facts (Per Serving)
It is important to consider this information as approximate and not to use it as definitive health advice.
Allergy Information
Please check ingredients for potential allergens and consult a health professional if in doubt.