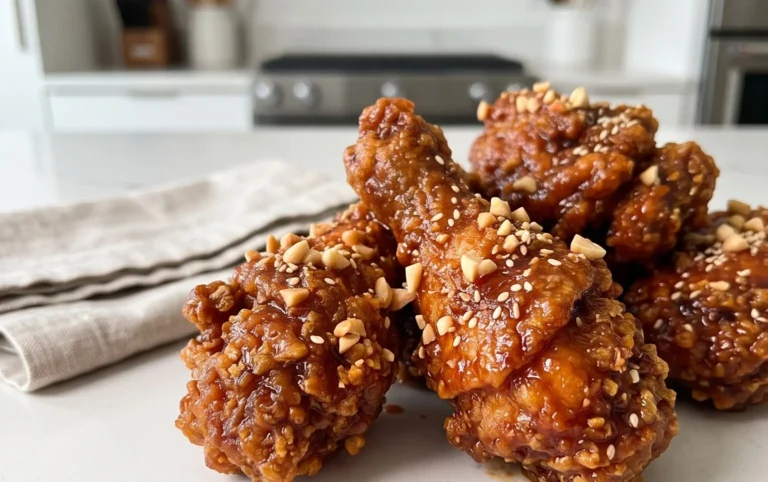
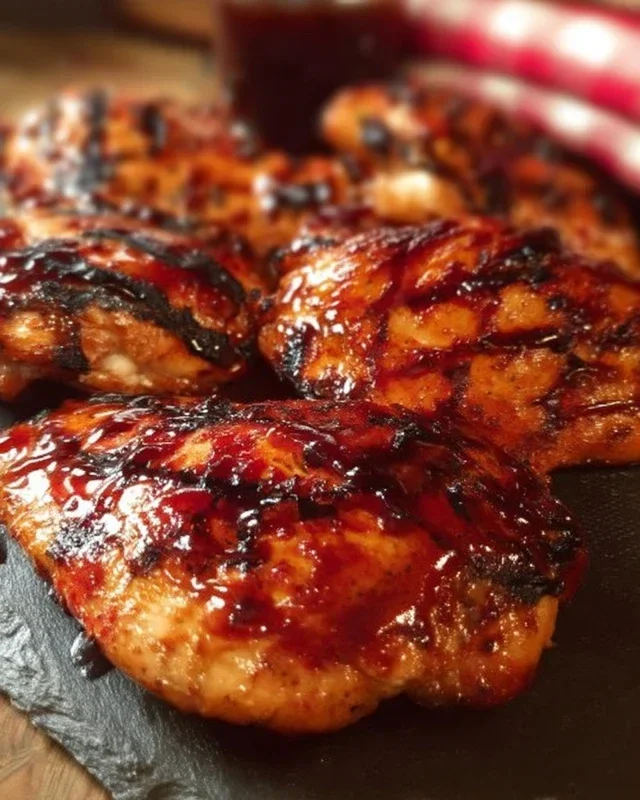
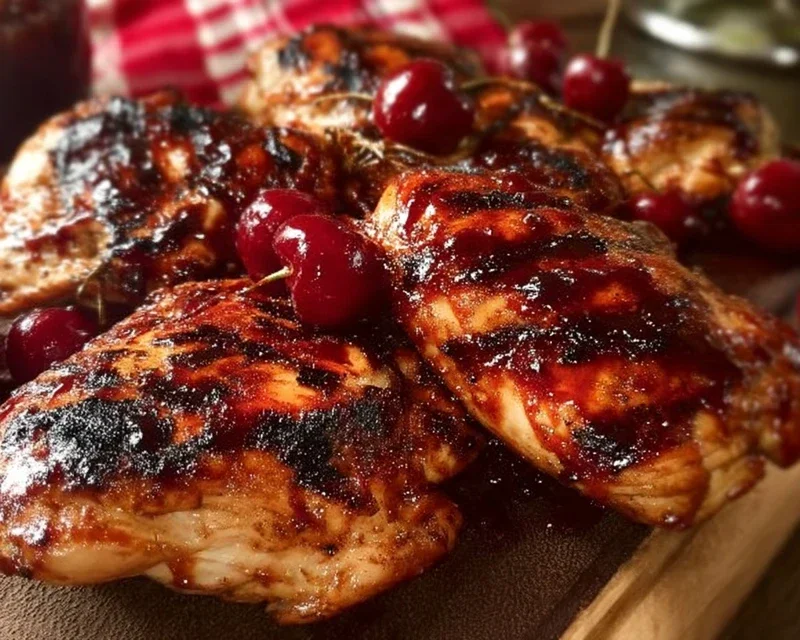
Cherry Dr-Pepper Grilled Chicken Recipe-Sweet & Smoky Flavor
Cherry Dr. Pepper Grilled Chicken is more than just a meal; it’s a culinary adventure that promises a symphony of sweet, tangy, and smoky flavors, all perfectly balanced for an unforgettable barbecue experience. This isn’t your average grilled chicken. What elevates it is the ingenious combination of a classic American soda with the vibrant, slightly tart burst of cherries, creating a marinade that transforms ordinary chicken into something truly extraordinary. Imagin extracte tender, juicy chicken pieces, kissed by the grill’s heat, boasting a glossy, caramelized exterior that hints at the incredible taste within. It’s the kind of dish that has everyone asking for the secret ingredient, and trust me, the secret to this Cherry Dr. Pepper Grilled Chicken is simply pure, unadulterated deliciousness waiting to happen on your grill.
Cherry Dr. Pepper Grilled Chicken
Get ready to fire up the grill and tantalize your taste buds with this incredibly delicious Cherry Dr. Pepper Grilled Chicken! This recipe takes simple chicken and transforms it into a sticky, sweet, and savory masterpiece with a unique flavor profile that’s sure to be a crowd-pleaser. The magic happens in the glaze, a delightful concoction that combines the classic sweetness of Dr. Pepper with the tangy notes of cherry, all balanced with smoky and savory undertones. It’s surprisingly easy to make and the results are truly spectacular. Perfect for backyard barbecues, weeknight dinners, or any occasion where you want to impress without a lot of fuss.
Ingredients:
Crafting the Irresistible Glaze
The heart of this recipe lies in the incredible glaze. It’s a simple simmer that transforms everyday pantry staples into a flavor explosion. Start by gathering all your glaze ingredients: the Cherry Dr. Pepper, ketchup, tomato paste, brown sugar, Worcestershire sauce, onion powder, black pepper, liquid smoke, chili powder, and minced garlic.
In a medium saucepan, combine the ketchup, tomato paste, brown sugar, Worcestershire sauce, onion powder, black pepper, liquid smoke, chili powder, and minced garlic. Give everything a good stir to combine. Now, open your 12 oz can of Cherry Dr. Pepper and pour it into the saucepan. As you pour, you’ll notice it fizzes up a bit, which is perfectly normal. Stir everything together until it’s well incorporated.
Place the saucepan over medium heat. Bring the mixture to a gentle simmer, stirring occasionally. Once it’s simmering, reduce the heat to low and let it cook, uncovered, for about 20-30 minutes. The goal here is to allow the sauce to thicken and the flavors to meld together beautifully. You’ll know it’s ready when it coats the back of a spoon. This simmering process is crucial for developing that rich, sticky texture that will adhere wonderfully to the chicken on the grill. Don’t rush this step; patience here will be richly rewarded with a more intense and delicious glaze. The aroma filling your kitchen will be a testament to the deliciousness to come!
Preparing the Chicken for the Grill
While your glaze is simmering and thickening, it’s time to get the chicken ready. Whether you’re using a whole chicken cut into pieces or a package of dark meat chicken thighs and drum extractsticks, pat them dry thoroughly with paper towels. This is a really important step for achieving beautifully grilled, crispy skin. Moisture is the enemy of browning and crisping!
Once the chicken pieces are dry, generously season them on all sides with the seasoning salt and paprika. Make sure to get into all the nooks and crannies. The seasoning salt provides a savory base, while the paprika adds a subtle warmth and a beautiful reddish hue to the finished product.
Grilling to Perfection
Now for the exciting part – grilling! Preheat your grill to medium-high heat. You want the grill to be hot enough to sear the chicken and create those lovely grill marks, but not so hot that it burns the glaze before the chicken is cooked through.
1. Initial Sear: Place the seasoned chicken pieces directly onto the preheated grill grates. Grill for about 5-7 minutes per side, without moving them too much, to develop nice grill marks and begin extract the cooking process. This initial sear helps to lock in the juices.
2. Glazing Time: After the initial searing, it’s time to start basting! Begin extract brushing the chicken generously with your homemade Cherry Dr. Pepper glaze. Don’t be shy with the glaze; you want a nice, thick coating.
3. Continuous Glazing and Flipping: Continue grilling, flipping the chicken every 5-7 minutes and basting with the glaze each time you flip. This process of repeated basting and flipping is key to building up those delicious layers of sticky, caramelized glaze. Keep an eye on the chicken to ensure it’s cooking evenly and the glaze isn’t burning. If you notice any areas browning too quickly, you can move the chicken to a cooler part of the grill.
4. Checking for Doneness: The chicken is done when it has reached an internal temperature of 165°F (74°C) in the thickest part of the thigh, avoiding the bone. This usually takes about 30-40 minutes of grilling time, depending on the size of your chicken pieces and the heat of your grill. You can use an instant-read meat thermometer for accuracy. The juices should run clear when pierced with a fork or knife.
5. Rest and Serve: Once the chicken is cooked through and beautifully glazed, remove it from the grill and let it rest for about 5-10 minutes before serving. This resting period allows the juices to redistribute throughout the meat, resulting in a more tender and moist chicken. While it rests, you can optionally spoon a little extra glaze over the top. Serve your Cherry Dr. Pepper Grilled Chicken hot and get ready for the compliments! This chicken is fantastic served with classic barbecue sides like coleslaw, potato salad, or corn on the cob. Enjoy every sweet, savory, and smoky bite!
Conclusion:
There you have it! This Cherry Dr. Pepper Grilled Chicken recipe is an absolute winner for several reasons. The sweet and tangy marinade, infused with the unique flavor of Cherry Dr. Pepper, transforms ordinary chicken into something truly special. It’s surprisingly easy to whip up, making it perfect for busy weeknights or relaxed weekend barbecues. The grill adds that irresistible smoky char, elevating the entire dish.
I love serving this Cherry Dr. Pepper Grilled Chicken alongside a crisp coleslaw, corn on the cob, or even some simple grilled sweet potatoes. For a heartier meal, consider serving it over rice or tucked into soft slider buns for a delicious sandwich.
Don’t be afraid to experiment! You can easily switch up the cherry Dr. Pepper with a different flavored soda for a new twist. Adding a pinch of cayenne pepper to the marinade will give it a nice kick. I wholeheartedly encourage you to give this recipe a try; I’m confident you’ll be delighted with the results!
Frequently Asked Questions:
Can I make this recipe ahead of time?
Yes, you absolutely can! The chicken can marinate in the Cherry Dr. Pepper mixture for up to 4 hours in the refrigerator. This allows the flavors to really penetrate the meat. Just make sure to bring it closer to room temperature before grilling for even cooking.
What if I don’t have a grill?
No problem at all! You can achieve a similar delicious result by baking the chicken in the oven. Preheat your oven to 375°F (190°C). Place the marinated chicken in a baking dish and bake for about 25-30 minutes, or until cooked through. You can also broil it for the last few minutes to get a nice caramelization.
Cherry Dr. Pepper Grilled Chicken
Juicy and flavorful grilled chicken marinated in a sweet and tangy Cherry Dr. Pepper glaze.
Ingredients
-
1 – 12 oz can Cherry Dr. Pepper
-
1 Cup Ketchup
-
1 – 6 oz. can tomato paste
-
1 Cup Brown Sugar
-
1 Tablespoon Worcestershire sauce
-
1/2 tsp. Onion Powder
-
1/2 tsp. black pepper
-
1/2 tsp. liquid smoke
-
1/2 tsp. Chili Powder
-
1 tsp. minced garlic
-
1 whole chicken cut up OR 1 package of dark meat chicken cut up about 12 pieces of chicken
-
3 teaspoons Seasoning Salt
-
1 tsp Paprika
Instructions
-
Step 1
In a saucepan, combine Cherry Dr. Pepper, ketchup, tomato paste, brown sugar, Worcestershire sauce, onion powder, black pepper, liquid smoke, chili powder, minced garlic, seasoning salt, and paprika. Bring to a simmer over medium heat, stirring occasionally. -
Step 2
Reduce heat to low and let the sauce simmer for 15-20 minutes, or until thickened, stirring frequently. Remove from heat and let cool slightly. -
Step 3
If using a whole chicken, cut it into serving pieces. If using dark meat chicken, ensure it’s about 12 pieces. -
Step 4
Place chicken pieces in a large resealable bag or shallow dish. Pour about half of the cooled sauce over the chicken, ensuring all pieces are coated. Marinate in the refrigerator for at least 1 hour, or preferably 2-4 hours. -
Step 5
Preheat your grill to medium-high heat. Lightly oil the grill grates. -
Step 6
Remove chicken from marinade, discarding the excess marinade. Grill chicken for about 6-8 minutes per side, or until cooked through and internal temperature reaches 165°F (74°C). -
Step 7
During the last few minutes of grilling, brush the chicken generously with the reserved sauce. Grill for an additional 1-2 minutes per side, allowing the sauce to caramelize.
Important Information
Nutrition Facts (Per Serving)
It is important to consider this information as approximate and not to use it as definitive health advice.
Allergy Information
Please check ingredients for potential allergens and consult a health professional if in doubt.