Perfect Grilled Pizza- Easy Recipe
How to Make the Perfect Grilled Pizza is about to transform your backyard into the hottest pizzeria in town. Forget soggy bottoms and unevenly cooked toppings; we’re talking about a pizza experience that’s truly next level. There’s something undeniably magical about that smoky char, the crisp yet chewy crust, and the way the cheese melts into gooey perfection, all kissed by the flames. People rave about grilled pizza because it captures the essence of authentic, rustic Italian cooking, but with a vibrant, outdoor twist. It’s the ultimate summer meal, ideal for casual gatherings, a romantic al fresco dinner, or just a fun weekend project. What makes this grilled pizza so special is the unparalleled texture and flavor that only a grill can impart. Get ready to ditch the delivery menus forever!
How to Make the Perfect Grilled Pizza
There’s something truly magical about pizza, and when you take it outside and grill it, it reaches a whole new level. The smoky char, the slightly crispy, wonderfully chewy crust, and the way the cheese melts to perfection – it’s an outdoor dining experience that can’t be beat. Forget soggy bottoms or burnt edges; with a few simple techniques, you can achieve grilled pizza perfection right in your backyard. This recipe will guide you through every step, ensuring a delicious and impressive meal for family and friends.
Ingredients:
Preparing Your Workspace and Dough
Before you even think about firing up the grill, it’s crucial to have everything prepped and ready to go. This is a fast cooking process, and you don’t want to be scrambling for ingredients or tools once the heat is on. First, ensure your pizza dough is at room temperature. Cold dough is notoriously difficult to stretch and will resist your efforts. Let it sit out on the counter for at least 30-60 minutes. This makes it pliable and easier to work with.
Next, gather all your ingredients. Slice any vegetables, cook any meats that need pre-cooking (like sausage or beef bacon), and have your sauces and cheeses measured and within easy reach. This mise en place is essential for a smooth grilling experience.
For dusting your pizza peel or a baking sheet, I highly recommend using cornmeal or semolina flour. These add a lovely texture to the bottom of the pizza and, more importantly, act as tiny ball bearings, allowing the pizza to slide off easily onto the grill. Avoid regular flour, as it can burn and leave a pasty residue.
Grilling the Pizza Dough
This is where the magic happens. The intense heat of the grill sears the dough, creating those coveted grill marks and a delicious, slightly smoky flavor.
1. Preheat Your Grill: This is the most critical step for success. You want your grill to be hot, so preheat it to medium-high heat (around 450-500°F). If you have a two-zone grill, set it up so you have a hotter side and a cooler side. This allows for flexibility in cooking and prevents burning. Let the grill preheat with the lid closed for at least 10-15 minutes. This ensures the grates are scorching hot and ready to impart that beautiful char.
2. Stretch and Oil the Dough: Lightly dust your work surface with cornmeal or semolina flour. Gently stretch your room-temperature pizza dough into your desired shape and thickness. Aim for about a 12-14 inch circle or rectangle. Be gentle; you don’t want to tear it. Once stretched, brush both sides of the dough lightly with olive oil. This oil helps prevent sticking and promotes even browning and charring on the grill.
3. Grill the First Side: Carefully transfer the oiled dough directly onto the hot grill grates. Close the lid and cook for 2-4 minutes, or until the underside is golden brown and you see distinct grill marks. Keep a close eye on it, as grill temperatures can vary. You’re looking for that perfect char, not burnt black. Using a metal spatula or tongs, carefully flip the dough over.
4. Assemble and Grill the Second Side: Once flipped, quickly work to add your toppings to the grilled side of the dough. Spread the pizza sauce evenly, leaving a small border for the crust. Sprinkle generously with mozzarella and Parmesan cheeses. Add your favorite toppings. Work efficiently here to minimize the time the lid is open. Close the lid and continue to grill for another 3-6 minutes, or until the crust is cooked through, the cheese is melted and bubbly, and the toppings are heated. If the pizza is cooking too quickly and the cheese isn’t melted, move it to a cooler part of the grill or briefly close the lid on a lower heat.
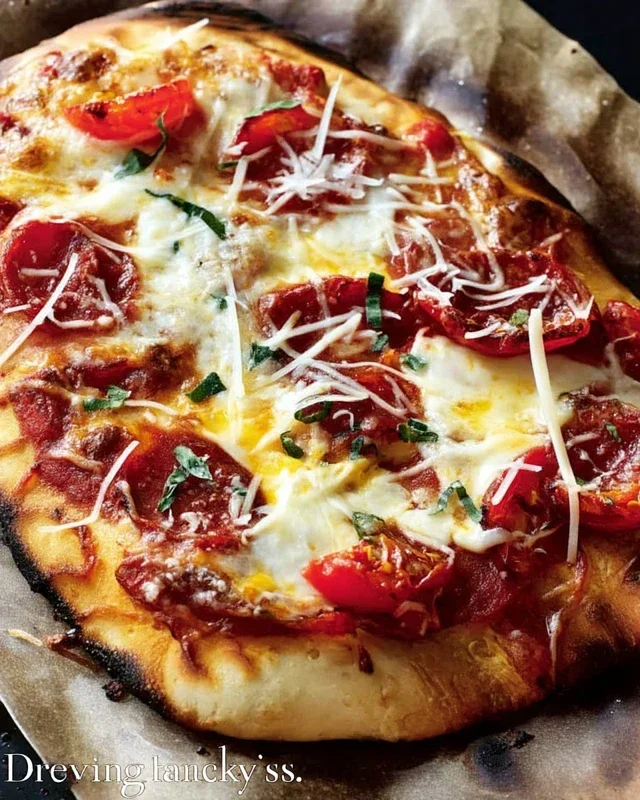
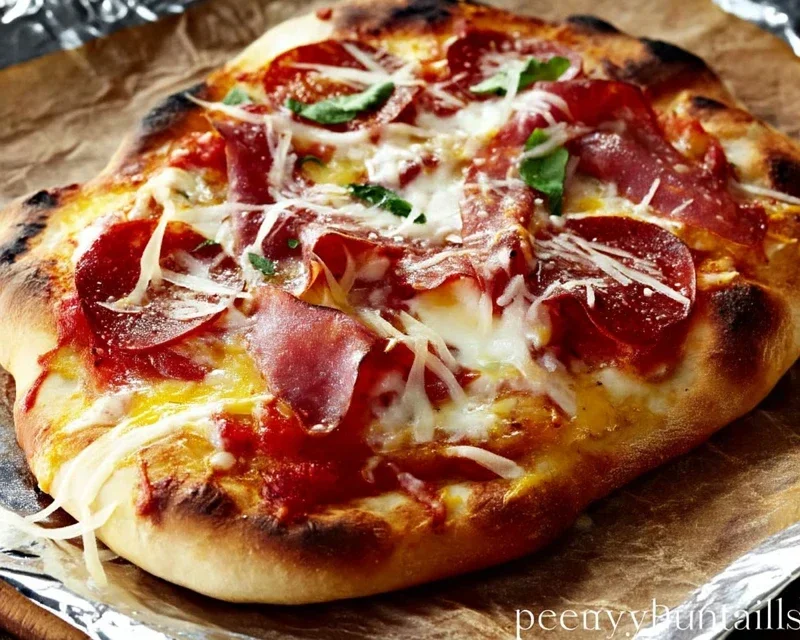
5. Finishing Touches and Serving: Once your pizza is perfectly cooked, carefully remove it from the grill using a pizza peel or large spatula. Let it rest for a minute or two before slicing. This allows the cheese to set slightly and prevents everything from sliding off. If you like, drizzle with a little extra olive oil, sprinkle with fresh basil leaves, or a pinch of red pepper flakes for a touch of heat. Slice and serve immediately. There’s truly nothing like a freshly grilled pizza!
Making pizza on the grill is a fantastic way to elevate your outdoor cooking. It’s forgiving, fun, and the results are consistently delicious. Don’t be afraid to experiment with different sauces, cheeses, and toppings to find your perfect grilled pizza combination. Enjoy the process and the incredible flavor!
Conclusion:
You’ve now unlocked the secrets to making the perfect grilled pizza, a truly sensational culinary experience that elevates your outdoor cooking game. The beauty of this recipe lies in its simplicity and the incredible results: a wonderfully smoky, chewy crust with beautifully blistered edges, perfectly complementing your chosen toppings. It’s a fantastic way to entertain guests or simply enjoy a delicious, personalized meal on a beautiful day. Don’t be afraid to experiment with different cheese blends, vibrant vegetables, and your favorite proteins. Think classic margherita, a spicy beef pepperoni with hot honey, or even a white pizza with ricotta and spinach. I encourage you to gather your ingredients, fire up the grill, and create your own masterpiece. You’ll be amazed at how easy and rewarding it is to achieve restaurant-quality grilled pizza in your own backyard!
Frequently Asked Questions (FAQs):
Can I make the pizza dough ahead of time?
Absolutely! Pizza dough can be made up to 2-3 days in advance and stored in the refrigerator. Punch it down once a day to keep it from over-proofing. When you’re ready to grill, let the dough sit at room temperature for about 30-60 minutes to become more pliable.
What kind of grill is best for making grilled pizza?
Both charcoal and gas grills work wonderfully. A gas grill offers more precise temperature control, which can be helpful for begin extractners. A charcoal grill, however, imparts an even deeper smoky flavor. Whichever you choose, ensure it’s clean and preheated to a medium-high heat (around 450-500°F or 230-260°C).
My crust is burning before the toppings cook. What am I doing wrong?
This is a common challenge! Make sure your grill is at the right temperature. You want it hot enough to cook the crust quickly but not so hot that it scorches. Another trick is to partially cook the crust on one side before adding toppings. Flip it, add your sauce and toppings to the cooked side, and then grill it with the lid on to melt the cheese and finish cooking the bottom.
The Perfect Grilled Pizza
Master the art of creating delicious pizzas on the grill, achieving a smoky flavor and perfectly crisp crust.
Ingredients
-
1 pound pizza dough
-
1/2 cup tomato sauce
-
8 ounces shredded mozzarella cheese
-
1/4 cup finely chopped onion
-
1/4 pound ground pork
-
2 tablespoons olive oil
-
Salt, to taste
-
Black pepper, to taste
Instructions
-
Step 1
Preheat your grill to medium-high heat (around 450-500°F). Clean the grill grates thoroughly. -
Step 2
In a skillet, brown the ground pork over medium heat. Drain off excess fat. Season with salt and pepper. -
Step 3
Divide the pizza dough in half. On a lightly floured surface, stretch or roll each half into a circular or oval shape, about 10-12 inches in diameter. -
Step 4
Brush one side of each pizza dough with olive oil. Carefully place the dough, oiled-side down, directly onto the hot grill grates. -
Step 5
Grill for 2-3 minutes per side, until golden brown and slightly puffed. Remove from grill. -
Step 6
Flip the pizza crusts over. Spread tomato sauce evenly over the grilled side of each crust, leaving a small border for the crust. Sprinkle with mozzarella cheese, chopped onion, and cooked ground pork. Season with additional salt and pepper if desired. -
Step 7
Carefully place the topped pizzas back on the grill. Close the lid and grill for another 5-8 minutes, or until the cheese is melted and bubbly and the crust is cooked through. -
Step 8
Remove from grill, let cool slightly, slice, and serve immediately.
Important Information
Nutrition Facts (Per Serving)
It is important to consider this information as approximate and not to use it as definitive health advice.
Allergy Information
Please check ingredients for potential allergens and consult a health professional if in doubt.